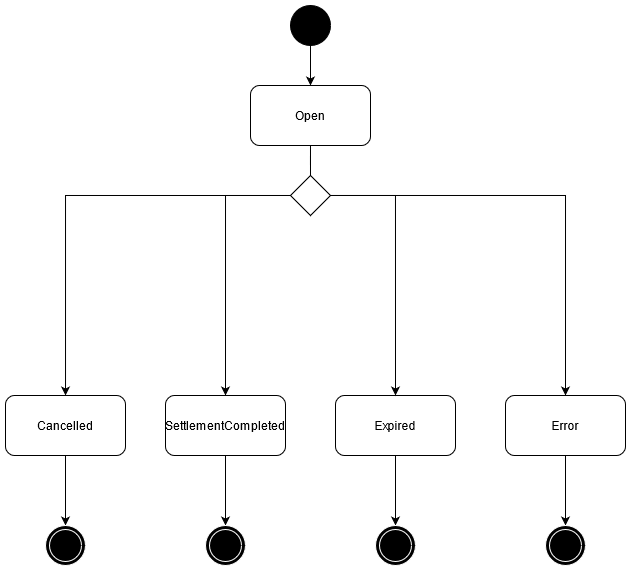
Card lifecycle management
Worldline supports the whole card lifecycle.
Please find below an illustration of the possible transitions from one status to another
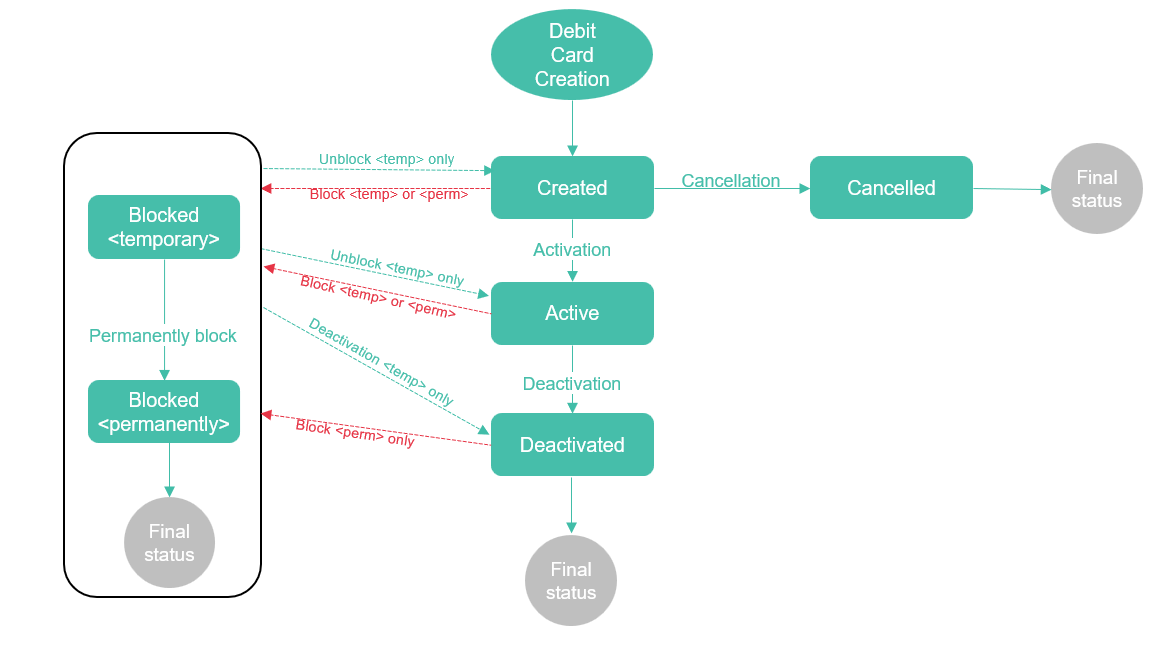
Activate a card
An issuer can activate a card on demand from Issuer Card External Reference or Card Reference only if the card is in CREATED status.
The issuer chooses the activation reason from the customised reasons previously configured.
As a result, the card is active in our system.
Note : The issuer can alternatively use one of the options offered by WL system to activate a card such as:
- Directly when the card is created
- or at first PIN based approved authorization
API links
Block a card
The API allows to block a card permanently (immediately or in the future) or to block a card temporarily depending on the configured blocking reason by using the Issuer Card External Reference or the Card Reference.
The card is in “CREATED” or “ACTIVE” status.
The blocking reason is chosen among the reasons configured beforehand for the issuer.
Example of use cases :
Use case 1: The card is blocked permanently, in case of lost, stolen, not delivered, fraudulent activity, for example.
The issuer can provide:
- Transfer Effective Date – estimated date when the card was lost or stolen
- If the PIN is compromised
- If the card is lost or stolen:
- Lost Stolen Date
- If the card is lost:
- Loss Circumstances
As a result, the card is definitively blocked in our system (final status).
Next online authorizations are declined for the card.
If the card is permanently blocked, it can be notified to the scheme (card exceptions file sent to Stoplist network).
Use case 2: The card has been compromised in Common Point of Purchase (CPP) : a permanent card blocking is scheduled for the card and the cardholder is still allowed to use its card for PIN based transactions by the issuer.
The issuer indicates that the card has been compromised in a Common Point of Purchase (cppFlag) and provides the delay to block the card in the future (scheduledCardBlockingDelay)
As a result, the card is still active in our system and a permanent card blocking is scheduled for the card.
Authorizations are still accepted for the card.
The card is effectively blocked via batch process once the scheduled permanent card blocking date is reached.
Use case 3: The card is blocked temporarily in case of fraud suspicion by e.g. Issuer or Fraud system.
Fraud information as free text (fraud code) can be provided and can be used later (e.g. in dispute management in case there is a fraud declared on this card)
As a result, the card is temporarily blocked in our system and can be unblocked later.
Next online authorizations are declined for the card.
It is also possible to update the following blocking information by this API :
- When the card is already blocked:
- Blocking reason among those available for the issuer
- Blocking detail
- Lost and stolen date if the blocking reason is LOST or STOLEN
- Fraud process
- The flag indicating whether the PIN is compromised
- Scheduled blocking information : delay or blocking reason if the delay is not yet reached
- When the card is active :
- Scheduled blocking information : delay or blocking reason if the delay is not yet reached
API links
POST /api/v2/issuers/{issuerId}/cards/{cardReference}/block
POST /api/v2/issuers/{issuerId}/cards/external-cards/{issuerCardExternalReference}/block
Example : Request for permanent blocking reason
- Issuer: 1234
- CardReference: 2000000000374460
- Blocking reason: LOST
POST /api/v2/issuers/1234/cards/2000000000374460/block
Request data
{
                   "blockingReason":"LOST",
                   "blockingReasonDetail":"LOST",
                   "comment":"comment",
                   "contactData":"contactData",
                   "customerRequestingBlockDate":"2022-10-14T08:14:08.493Z",
                   "fraudCode":"01",
                   "lastUsageDate":"2022-10-11T11:14:08.493Z",
                   "lastUsagePlace":"lastUsage",
                   "lossCircumstances":"lossCircumstances",
                   "lossCountry":"lossCountry",
                   "lossPlace":"lossPlace",
                   "lossReportedBy":"lossReportedBy",
                   "lossReportedVia":"lossReportedVia",
                   "lostStolenDate":"2022-10-11T11:14:08.493Z",
                   "noReplacementReason":"tempAddr",
                   "pinCompromised":true,
                   "transferEffectiveDate":"2022-10-14T08:14:08.493Z"
                }
Response data
"data":{
                   "cardIdentifier":{
                      "cardReference":"2000000000374460"
                   },
                   "status":"BLOCKED",
                   "blockingReason":"LOST",
                   "blockingReasonDetail":"LOST",
                   "cardBlockingDateTime":"2022-12-05T16:16:19.514+00:00"
                }
Unblock a card
An issuer can reactivate a temporarily blocked card.
The card is in temporary “Blocked” status.
The issuer identifies the card with their own reference (Issuer Card External Reference) or with the reference generated by WL (Card Reference).
The issuer chooses the unblocking reason from the reasons configured beforehand for him.
As a result, the card is active again in our system.
An issuer cannot request the unblocking of a permanently blocked card.
API links
Block all cards with same PAN or same PAN reference
The API is similar to Block a card API but is applied to all cards having the same PAN or same PAN reference.
The API allows the permanent blocking (immediately or in the future), or temporary blocking, depending on the configured blocking reason, of all cards having the same PAN or same PAN reference.
Cards must be in “CREATED” or “ACTIVE” status.
The blocking reason is chosen from the reasons configured beforehand for the issuer
It is also possible to update the following blocking information by this API :
- When the card is already blocked:
- Blocking reason among those available for the issuer
- Blocking detail
- Lost and stolen date if the blocking reason is LOST or STOLEN
- Fraud process
- The flag indicating whether the PIN is compromised
- Scheduled blocking information : delay or blocking reason if the delay is not yet reached
- When the card is active :
- Scheduled blocking information : delay or blocking reason if the delay is not yet reached
API links
Unblock all cards with same PAN or same PAN reference
The API is similar to Unblock a card API but is applied to all cards having the same PAN or same PAN reference.
The API allows the unblocking of all cards having the same PAN or same PAN reference.
Cards must be in temporary “Blocked” status.
The unblocking reason is chosen from the reasons configured beforehand for the issuer.
The Issuer cannot request this API for permanently blocked cards.
As a result, cards having the same PAN or same PAN reference are active again in our system.
API links
Deactivate a card
The API allows an active card, or a temporary blocked card, to be deactivated on demand, by using the Issuer Card External Reference or the Card Reference.
The deactivation reason is chosen from the reasons configured beforehand for the issuer.
As a result, the card is deactivated in our system.
This process is not reversible. New card authorizations are declined. If necessary, a request for a card replacement may be made by the issuer.
This API allows also to cancel a card in “Created” status, e.g., when the card production has failed.
API links
Replace a card
The API allows a card, that has not yet been replaced or renewed, to be replaced when the card is lost/stolen or damaged, or when the customer’s information has changed, by using the Issuer Card External Reference or the Card Reference.
The card contract must be ACTIVE with no replacement blocking and the card must not be in CREATED status.
The replacement reason is chosen from the reasons configured beforehand for the issuer.
Data that may need to be changed during replacement can be provided, such as: card data (e.g., embossing name), order data (e.g., card producer if several are allowed), customer data (e.g., name), PIN.
As a result, the new card is created, a card order and a PIN mailer order are created when applicable (physical card requested).
In case a product change on renewal is planned on the contract of the card to be replaced, the card will not be replaced but the product change will be forced instead. From the request, only blocking reason and embossingName/embossingName2ndLine will be considered :
- If blocking reason is provided (for temporary blocking only), the new card of the new contract is blocked with this reason
- If embossingName and/or embossingName2ndLine are provided, they will be appplied to the old card and will be transferred to the new card of the new contract.
In the request response, information related to the new contract and the product change will be returned.
Idempotency is managed by the API; that is, if the request with the same WL-Correlation-ID is sent multiple times, it will be executed only once. The response will be retrieved directly from our system.
API links
POST /api/v2/issuers/{issuerId}/cards/{cardReference}/replace
POST /api/v2/issuers/{issuerId}/cards/external-cards/{issuerCardExternalReference}/replace
Example Replacement Request for LOST_STOLEN replacement reason
- Issuer: 1234
- CardReference: 2000000000374460
- replacement reason: LOST_STOLEN
POST /api/v2/issuers/1234/cards/2000000000374460/replace
Request data:
{
                   "waiveFee":false,
                   "replacementReason":"LOST_STOLEN",
                   "cardContract":{
                      "specificFields":{
                         "additionalProp1":"string",
                         "additionalProp2":"string",
                         "additionalProp3":"string"
                      },
                      "card":{
                         "issuerCardExternalReference":"CARD-20221119",
                         "cardOrder":{
                            "specificFields":{
                               "additionalProp1":"string",
                               "additionalProp2":"string",
                               "additionalProp3":"string"
                            },
                            "sendingMode":"Normal"
                         }
                      }
                   },
                   "overrideDistributionRules":false
                }
Response data:
"data":{
                   "card":{
                      "cardIdentifier":{
                         "cardReference":"2000000000374491",
                         "issuerCardExternalReference":"CARD-20221119"
                      },
                      "pan":"4546174672045636",
                      "maskedPan":"454617******2386",
                      "expiryDate":"1227",
                      "panSequenceNumber":"1",
                      "status":"ACTIVE",
                      "replacementFor":{
                         "cardReference":"2000000000374460"
                      },
                      "orders":[
                         {
                            "orderIdentifier":{
                               "orderReference":"202212052000000000374492"
                            },
                            "orderType":"CardOrder",
                            "currentInternalStatus":"ORDERABLE"
                         }
                      ],
                      "panReference":"1500d015027a202e47b39d56e25aab9fcc1d"
                   },
                   "replacementForCardStatus":"BLOCKED",
                   "replacementReason":"LOST_STOLEN",
                   "cardReplacementDateTime":"2022-12-05T16:27:57.340+00:00"
                }
Block and replace a card
The API allows a card identified by the Issuer Card External Reference or the Card Reference to be blocked and replaced.
This API regroups Block a card (for card blocking or blocking information update) and Replace a card APIs in a single request.
As result, the card is blocked and the new card is created.
If any error occurs while card blocking or card replacing, the card is neither blocked nor replaced.
With this API, it is also possible to block all cards having the same PAN than the card referenced by Issuer Card External Reference or the Card Reference. In this case Block all cards API is called instead Block a card API.
In case a product change on renewal is planned on the contract of the card to be replaced, the card will not be replaced but the product change will be forced instead. From the replace card request, only blocking reason and embossingName/embossingName2ndLine will be considered :
- If blocking reason is provided (for temporary blocking only), the new card of the new contract is blocked with this reason
- If embossingName and/or embossingName2ndLine are provided, they will be applied to the old card and will be transferred to the new card of the new contract.
In the request response, information related to the new contract and the product change will be returned.
Idempotency is managed by the API; that is, if the request with the same WL-Correlation-ID is sent multiple times, it will be executed only once. The response will be retrieved directly from our system.
API links