Create your card portfolio
The first step you will follow as an Issuer will be the creation of your card portfolio. In Worldline Card Issuing, a card portfolio will be represented by several card products, each card product being a set of parameters defining the behaviour of the future cards created.
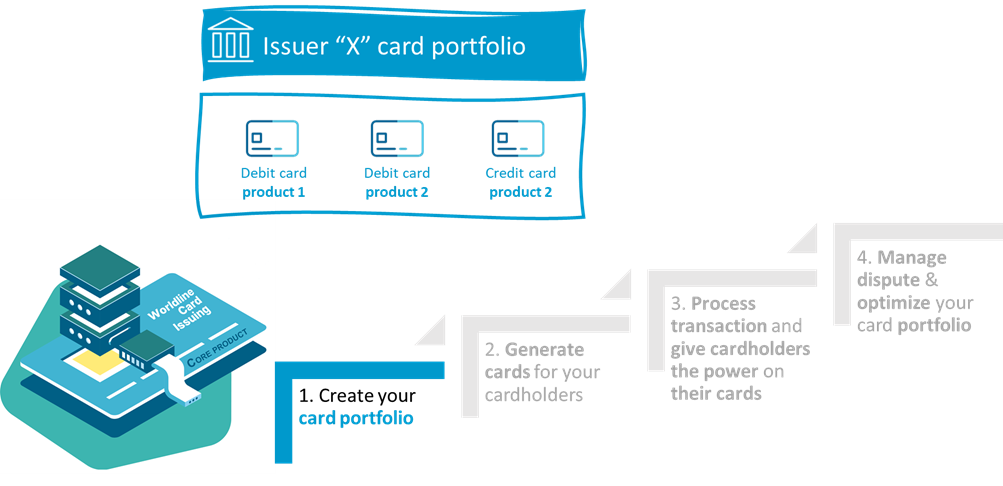
3 categories of business parameters are supported in Worldline Card Issuing :
- Card personalization & life cycle parameters : activation rule, PIN production, replacement rule, renewal rule, card artwork (design), form factor…
- Card account parameters : debit/credit or prepaid, scheme, limits, cycling closure (for credit), instalments policies…
- Card membership fee : annual/monthly fee, reimbursement rule and add-ons (ie. insurance)
Choose the type of cards for your issuing portfolio
In the Worldline Card Issuing system, several standard card products are already preconfigured, this allows issuers to speed-up the card portfolio creation. The defined card products are based on the moment when they pay for the goods they get and the funding options.
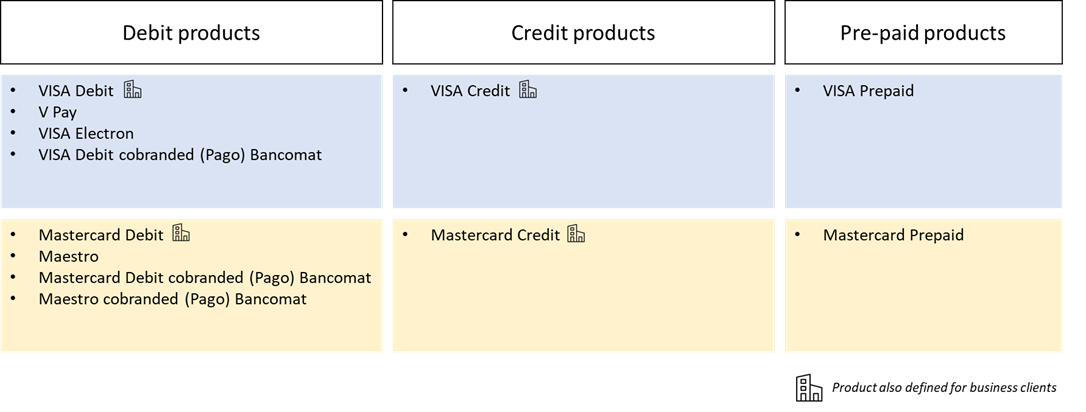
In order to perfectly match issuers’ strategies, these pre-configured card products can be overridden or/and adjusted for every issuer.
Anatomy of a Debit card product
A “standard“ debit card product corresponds to a card linked to a cardholder’s current account managed on the Issuer side, with velocity limits, leading at the end to a direct debit of the cardholder’s account for each authorized transaction.
Anatomy of a credit card product
Two kinds of credit funded card products can be defined on Worldline Card Issuing:
- Deferred Debit or Charge: the cardholder has to repay the debt to the Issuer in full by the due date, usually on a monthly basis. The given time of settlement is linked to a predefined billing date, typically reached monthly. The charge card, unlike a credit card, does not charge interest.
- Revolving Credit Cards: a revolving credit account is created to grant a credit line to the cardholder. In contrast to the full payment required by the charge card or deferred debit card, credit cards allow the consumers a continuing balance of debt, but subject to interest charge.
Contrary to debit cards associated to cardholders’ current accounts managed on the Issuer side; for credit cards, Worldline Card Issuing entirely support the complexity of managing credit limit and billing cycles.
Anatomy of a Pre-paid card product
A “standard“ prepaid card product corresponds to a card with a preloaded amount by you as an Issuer that can be reloaded on cardholders demand. For this kind of card product, Worldline Card Issuing supports: loading rules, authorization and spending rules…all these parameters allowing you as an Issuer to support a wide variety of use cases as illustrated below:

Commercial Card Overview
Commercial Cards are defined by the European Commission as a payment card which is used for professional expenses addressing commercial organizations and its employees. It is a complete range of payment cards meeting all the needs of a company, including but not limited to the following business objectives:

Whatever their funding type (credit, charge, debit, prepaid or even charge), Worldline Card Issuing supports multiple product types for Corporates – physical cards, virtual cards, and lodged account. Corporate customers can gain benefits for Travel and Purchasing use-cases, not matter if realized by multi-purpose Business Cards or by use-case specific card product like Corporate Cards.
To enable Worldline Commercial Card Issuing, the product settings and business processes are altered:
- Master-data-structures can depict hierarchies up to 15 levels within the same company
- Several payment products can be allocated into the same hierarchy structure
- Application processes support multi-level product like Corporate Cards
- Corporate can chose if the payee is the Corporate or the Employee
- Payment delay & Different billing cycles
- Dedicated charges can be rolled up to company level
- Issuer Reports contain additional data
Multi Use Cards
A multi-use card is a card product that contains multiple funding sources (e.g. prepaid, debit and credit). Multi use cards allow issuers to offer, for example, a debit and a credit card on one physical card body. The term combo cards is also often used for the combination of two financing sources in one card.
To select or distinguish between the two funding sources of the card, the physical card is equipped with two PANs, one for each use case (e.g. debit PAN and credit PAN). At the merchant's POS, the cardholder can select the funding source directly at the POS terminal. With the "Debit" option, for example, he would opt for a direct debit payment; if he chose the "Credit" option, the payment would be processed as a credit transaction.
In this way, a single physical card can be created for multiple purposes.
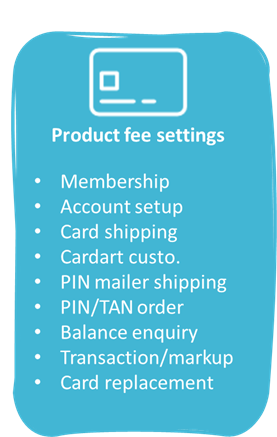
Define the Fees for your Card Portfolio
Having a flexibility in the definition of fees being key in an issuing strategy, Worldline Card Issuing allows you to constantly adjust fee policies for each card product of your portfolio by accessing to a fine-grained list of settings.
In addition to the “standard” settings shown in the illustration besides, additional ones can be added on credit card products such as:
- Interests on credit lines,
- Overlimit fee (Open-to-buy exceeded)
- Statement/statement reprinting fee
- Direct debit returned/rejected fee
Captures
Captures (v1.0.3 update ongoing)
Currently the following 4 Capture stage actionTypes are supported within the Accept Transactions API.
actionType definitions
actionType | definition |
| CAPTURE | In CNP a CAPTURE follow-up action (operation) needs to be sent in by the API user so that the Back Office can CLEAR the transaction. Note: In POS the HOST sends in the CAPTURE (Advice) after the terminal has sent in the COMPLETION action on a purchase so the Back Office can clear the transaction. There are time limits between the original action (operation) and the last capture that depends on whether the original action (operation) was an authorization or a pre-authorization: NOTE: VISA does not allow estimated amounts/incremental for all MCCs. Please consult the pre-authorization section. |
| CAPTURE_SPLIT | A CAPTURE can be split into multiple partial CAPTURES e.g. in case the goods are delivered at multiple intervals in time. Each partial CAPTURE must contain the sequenceNumber. By the last partial CAPTURE it is mandated to send in the sequenceCount of the number of Partial Captures. |
| AUTH_AND_CAPTURE | This action type Triggers card Dual message actionTypes “AUTH” and “CAPTURE”. This action can be used for Service "Purchase" and Service “Refund”. For this action no cancellation is available. |
| AUTH_AND_CAPTURE_REVERSAL | This actionType triggers a technical reversal on an actionType AUTH_AND_CAPTURE for service "Purchase" or "Refund" e.g. in case of a time-out. Due to current limitations, this actionType always triggers in clearing a PRESENTMENT_REVERSAL. In case the PRESENTMENT and PRESENTMENT_REVERSAL are in the same clearing batch, they are not sent out to scheme. Alternately, idempotency can be used; this is on the API roadmap. |
Capture Request
In Card Not Present it is common to use two separate steps (actionType AUTH and actionType CAPTURE) to complete a Service Purchase and Service Refund. The AUTH actionType is typically used by the Merchant in a Purchase service to reserve the funds at the cardholder when the goods are bought in the webshop. The CAPTURE actionType is typically used when the goods are shipped to request the funds.
The requestor must send in the capture request to complete the transaction and receipt of money. In a capture request the following data elements may be present.
Request actionType CAPTURE
Category | Field | Presence | Comment |
| actionType | Mandatory | Type of action requested. Possible values: -“CAPTURE” -“CAPTURE_SPLIT” | |
| service | Mandatory | Service requested. The follow-up actions must have the same value as the initial action. Possible value: -“Refund” | |
| Identification | requestorId | Mandatory | Identifies the system or application that is sending the request. The values are allocated and assigned by Worldline. This field enables Worldline to distinguish the callers and to consider received information in their context (e.g. transaction references). |
| actionId | Mandatory | Identifier assigned by the caller to the transaction. The provided values must be unique with respect to the requestor. That is, two requests generated by the same requestor must have different identifiers. The only exception is a retry/reattempt where the original value must be taken. The identifier must be in UUID format. | |
| transactionId | Mandatory | Unique identification assigned by Worldline to a business transaction. The value from the initial authorization (e.g. AUTH or PREAUTH action) response must be used to populate this field. | |
| originalTransactionId | Conditional | Reference to the original purchase, which is refunded. It should contain the transaction id present in the authorization response of the original purchase if service is “refund”. | |
| acquirerId | Mandatory | Identification of the acquirer, assigned by Worldline | |
| cardAcceptorId | Mandatory | Identification of the merchant, assigned by Acquirer | |
| pspId | Conditional | Identification of the PSP, presence is mandated if assigned by Worldline | |
| pspReference | Optional | PSP’s reference for the transaction | |
| merchantReference | Optional | Merchant’s reference for the transaction | |
| Financial | requestAmount | Mandatory | Final amount of the transaction, i.e. the amount for which the cardholder should be debited. When the transaction amount is split in multiple captures, the requestAmount should be the partial transaction amount, for which the cardholder should be debited, except for the last capture of the transaction (data element captureSequenceCount is present). In the last capture request, requestAmount should be the total amount of the business transaction. |
| Circumstance | actionDateTime | Mandatory | Date and time in local time zone when the capture is requested |
| channel | Mandatory | Channel used by the cardholder to purchase the goods or services. Possible values: -“Poi” -“ECommerce” -“MailOrder” -“PhoneOrder” | |
| Card | cardNumber | Conditional | Primary Account Number of the card, conditional on how long after initial AUTH the follow-up action such as Capture takes place. • Optional for follow-up actions such as Captures for up to 30 days after initial AUTH (unless period is extended in agreement with acquirer). • Mandatory starting from 30 days after initial AUTH (unless period is extended in agreement with acquirer). |
| cardExpiryDate | Conditional | Card Expiration Date, conditional on how long after initial AUTH the follow-up action such as Capture takes place. • Optional for follow-up actions such as Captures for up to 30 days after initial AUTH (unless period is extended in agreement with acquirer). • Mandatory starting from 30 days after initial AUTH (unless period is extended in agreement with acquirer). |
Captures should be repeated until a response is received. When a capture is repeated, it should have the same actionId as the original capture request so that Worldline can detect duplicates.
If you have not received a Capture response after 3 attempts, please contact Worldline FS support or your bank depending on the agreements in place.
Capture Response
In a capture response message, the following data elements can be present.
Response fields to CAPTURE actionType
| Category | Field | Presence | Comment |
| actionId | Mandatory | Echoed from the request | |
| transactionId | Mandatory | Unique identification assigned by Worldline to a business transaction. This field is returned in the response of the initial Authorization request (AUTH or PREAUTH actionType) and must be used in all subsequent action requests and responses for the same business transaction. | |
| declined | Mandatory | Boolean (true or false) whether the request has been completely declined or not | |
| declineCause | Conditional | Reason why a request has been declined. Only present when the request has been declined completely | |
| hints | Optional | Additional information for cardholder and/or merchant regarding transaction outcome and the next step to be taken. | |
| responder | Mandatory | Indicates the entity which finally determined the outcome of the transaction. Possible values: -“Recipient”: Worldline -“Partner”: main entity (e.g. issuer or card scheme) being involved by Worldline in transaction processing | |
| responderDetails | Mandatory | Response code provided by the entity which determined the final outcome of the transaction. In case this entity is Worldline, it is the internal result code of Worldline. This value is only provided for information purpose since the content is subject to change. The field must not be evaluated automatically. For decisions done by a partner this field provides the response code delivered by him. In case Worldline directly interacts with the card scheme via ISO 8583 it is the DE 39 field content from the returned response message. | |
| paymentAccountReference | Conditional | A Payment Account Reference (PAR) is a unique value associated with a single PAN and attributed to all tokens associated with that PAN. A PAR can be used to link transactions containing PANs or tokens associated with the same underlying payment account. This field is present if returned by the card scheme. |
Multiple Partial Captures (Capture_Split)
A CAPTURE can be split into multiple partial CAPTURES e.g. in case the goods are delivered at multiple intervals in time. Each partial CAPTURE must contain the sequenceNumber. By the last partial CAPTURE it is mandated to send in the sequenceCount of the number of Partial Captures.
Request actionType CAPTURE_SPLIT (multiple partial captures)
Category | Field | Presence | Comment |
| actionType | Mandatory | Type of action requested. Set to: -“CAPTURE_SPLIT” | |
| service | Mandatory | Service requested. Set to: -“Purchase” | |
| Identification | requestorId | Mandatory | Identifies the system or application that is sending the request. The values are allocated and assigned by Worldline. This field enables Worldline to distinguish the callers and to consider received information in their context (e.g. transaction references). |
| actionId | Mandatory | Identifier assigned by the caller to the transaction. The provided values must be unique with respect to the requestor. That is, two requests generated by the same requestor must have different identifiers. The only exception is a retry/reattempt where the original value must be taken. The identifier must be in UUID format. | |
| transactionId | Mandatory | Unique identification assigned by Worldline to a business transaction. The value from the initial authorization (e.g. AUTH or PREAUTH action) response must be used to populate this field. | |
| captureSplit | captureSequenceNumber | Mandatory | Number of current CAPTURE in the sequence starting from 1. Increment for each split CAPTURE. To be used when a split of the CAPTURE is needed (CAPTURE_SPLIT). |
| captureSequenceCount | Mandatory | Total number of captures for the transaction lifecycle flow. Mandatory for final/last CAPTURE. When sequenceNumber = sequenceCount it is assumed to be the last CAPTURE for the transaction lifecycle flow and no more captures will be accepted. Note: the last capture requestAmount is the sum of all the split capture amounts. This is to ensure any remaining amount is reversed. To be used when a split of the CAPTURE is needed (CAPTURE_SPLIT). |
Authorization and Capture
In some cases such as with a Refund, the Merchant may want to request both Authorization and Capture steps at the same time.
The request must then include the actionType “AUTH_AND_CAPTURE”, and the other mandatory and conditional authorization fields described under actionType AUTH.
Request actionType AUTH_AND_CAPTURE fields
| Category | Field | Presence | Comment |
| actionType | Mandatory | Type of action requested. Set to: -“AUTH_AND_CAPTURE” | |
| service | Mandatory | Service requested. The follow-up actions must have the same value as the initial action. Possible values: -"Purchase" -“Refund” |
Disclaimer
The Open API specification is leading for integrations purposes. The Accept Transactions API documentation provides guidance on what is to be sent in for a particular transaction acceptance request (use case, action, brand, MCC, etc.).
The developer portal documentation does not provide a comprehensive set of rules and regulations on what request call body to send into the Accept Transactions API. To stay compliant and avoid data integrity issues, always consult the Card scheme processing rules. In addition, always consult your regulatory rules and regulations (for example consult the European Banking Authority websites for latest PSD II and SCA rules).
Merchant management doc
Merchant management
Worldline FS Merchant Management module offers full and final merchant settlement based on Worldline FS: scheme clearing, scheme settlement files, merchant pricing engine, and merchant configuration as stored in the merchant contract system.
As trusted partner, Worldline FS manages the contract data of its clients’ customers.
- Show merchant contract data in your application of preference.
- Manage your own merchant contracts in real-time at all contract hierarchy levels in the merchant contract system.
- Acquirers can allow third parties access to retrieve own merchant contract data and allow limited updating of own merchant contracts.
WL FS Acquiring Merchant Contract hierarchy:
- Level 1: Acquirer (determined by the users access credentials)
- Level 2: Holding
- Level 3: Merchant (can be grouped)
- Level 4: Contract
- Level 5: Site (sub-Merchant, URL, Location)
- Level 6: Terminal
Merchant management calls
The WL FS merchant contract API enables retrieval and updating at all contract hierarchy levels. For third parties, contract updating is limited depending the generic user role (e.g. PSP, PayFac, Merchant) limitations agreed with the acquiring bank.
You can retrieve data by providing key parameters (e.g. contractId, siteId, terminalid), and other search criteria such as IBAN.
There are two types of GET METHOD Contract calls:
- GET calls to search (e.g. GET Holding List, GET Merchant List, GET Contract List, GET Site List, GET Terminal List) using one or more query parameters. Valid calls return a list with limited data.
- GET calls to retrieve a specific entity return part of a contract entity (e.g. holding, merchant, contract, site, terminal).
In addition to retrieval, there are several METHODs which allow for contract Updating of own merchant contract data:
- Use POST call for adding a new contract entity (e.g. site, terminal).
- Use PATCH calls to change an existing contract call entity (e.g. addresses).
- Use DELETE calls to terminate (block) a contract call entity (e.g. site, terminal).
Parameters in bold are mandatory to complete a call.
To ensure best search call response time please use as many parameters as available.
Worldline Sandbox - Example set-up Payment Facilitator merchantId

Authorizations
Authorizations (v1.0.3)
Currently the following 6 Authorization stage actionTypes are supported within the Accept Transactions API.
actionType definitions
actionType | definition |
| AUTH | The Authorization (final) message reserves the cardholder amount with Issuer bank. |
| PREAUTH | A PREAUTH reservation at Issuer bank is made when the final purchase amount is not yet known. Example is the amount reserved at hotel check-in for 2 day stay, before mini-bar usage has been take into account. |
| AUTH_REVERSAL | This is used to release the funds RESERVED on the cardholders’ account as a result of an APPROVED AUTHORIZATION. You must not use this follow-up action (operation) if you have already sent a CAPTURE on the transaction. |
| AUTH_INCREMENTAL | Adjusts the pre-authorized amount up. An incremental is a pre-authorization exclusive follow-up action (operation) that can be sent if the final amount is higher than the previously pre-authorized amount. Later on when capturing the transaction you must specify the last correct amount. |
| AUTH_REVERSAL_PARTIAL | Adjusts the pre-authorized amount down. A partial reversal is a pre-authorization exclusive follow-up action (operation) that can be sent to reverse parts of the pre-authorized amount. |
| AUTH_AND_CAPTURE | This action type Triggers card Dual message actionTypes “AUTH” and “CAPTURE”. This action can be used for Service "Purchase" and Service “Refund”. For this action no cancellation is available. |
Key Topics Authorizations
CardholderVerificationMethod and 3DSecure
SCA Exemptions and Merchant Initiated Transactions
Tokenization
Optional Transaction References
Payment Facilitator
Authorization Response
Service Account_Verification
Authorization requests - Basic mandatory
Basic mandatory Card Not Present Authorization request message fields for actionTypes AUTH and PREAUTH are listed in table below.
Request actionType AUTH - Basic mandatory fields
Category | Field | Presence | Comment |
| actionType | Mandatory | Type of action requested. Possible values: -“AUTH” -“PREAUTH” | |
| service | Mandatory | Service requested. The follow-up actions must have the same value as the initial action. Possible values: -“Purchase” -“Refund” -“AccountVerification” | |
| Identification | requestorId | Mandatory | Identifies the system or application that is sending the request. The values are allocated and assigned by Worldline. This field enables Worldline to distinguish the callers and to consider received information in their context (e.g. transaction references). |
| actionId | Mandatory | Identifier assigned by the caller to the transaction. The provided values must be unique with respect to the requestor. That is, two requests generated by the same requestor must have different identifiers. The only exception is a retry/reattempt where the original value must be taken. The identifier must be in UUID format. | |
| acquirerId | Mandatory | Identification of the acquirer, assigned by Worldline | |
| cardAcceptorId | Mandatory | Identification of the merchant, assigned by acquirer | |
| pspId | Conditional | Identification of the PSP, presence is mandated if assigned by Worldline. | |
| Financial | requestAmount (amount + currency) | Conditional | Amount for which authorization is requested. Presence is mandatory if Service is “Purchase” or “Refund” |
| Circumstance | actionDateTime | Mandatory | Date and time in local time zone when the authorization is requested |
| channel | Mandatory | Channel used by the cardholder to purchase the goods or services. Possible values: -“Poi” -“Ecommerce” -“MailOrder” -“PhoneOrder" | |
| Card | cardNumber | Mandatory | Primary Account Number of the card |
| cardExpiryDate | Mandatory | Card Expiration Date |
Cardholder Verification Method and 3DSecure
The Accept Transactions API supports two types of Cardholder Verification Methods: CCV2 and 3DSecure.
According to European Banking Authority (EBA) Payment Service Directive (PSD) 2, Strong Customers Authentication (SCA) is mandated for cards issued within the EEA.
Standard Cardholder Verification Method in EEA is to use EMV 3DSecure for accepting card transactions.
Cardholder Verification Method CCV2 does not qualify as SCA.
Some types of transactions may be exempted from the EBA SCA rule.
Request actionType AUTH - Cardholder Verification Method and 3DSecure fields
Category | Field | Presence | Comment |
| Circumstances | cardholderVerificationMethod | Mandatory | Indicates how the identity of the cardholder is verified. Possible values: -“Cvv2” -“3DSecure” -“OfflinePin” -“OnlinePin” -“Signature” -“None” |
| initiatorType | Mandatory | Indicates who has triggered the action. This could either be the cardholder or the merchant (acceptor). In the first case it is a Cardholder Initiated Transaction (CIT) and in the second a Merchant Initiated Transaction (MIT). Possible values: -“Cardholder” -“Acceptor” | |
| Card | cvv2 | Conditional | Card Verification Code/Card Verification Value printed on the back of the card. |
| 3DSecure | result | Conditional | Result of the 3D secure authentication process. Possible values: -“Full” -“Attempt” -“MerchantRisk” -“IssuerRisk” -“DataOnly” |
| dsTransactionId | Conditional | Transaction Id generated by the directory server (3D Secure version 2.x) | |
| version | Conditional | 3D version used. Possible values: -"V1" -"V2" | |
| authenticationValue | Conditional | Authentication Value according to directory server response of the ACS, which is either the Mastercard UCAF (AAV, SPA) or the VISA/Diners/UnionPay/JCB CAVV data. | |
| dsEci | Conditional | Electronic Commerce Indicator according to directory server response of the ACS. The values are scheme dependent. | |
| subVersion | Conditional | 3D Secure Sub-version used. Mandatory for Mastercard. EMV 3DS minor version should be used to populate the subversion. |
SCA Exemptions and Merchant Initiated Transactions
According to EBA PSD2, Strong Customers Authentication is mandated for cards issued within the EEA.
Under SCA-rules exemptions are possible for e.g. low value payments or Merchant Initiated Transactions.
Request actionType AUTH - PSD2 SCA Exemptions, Merchant Initiated Transactions, Tokenization, Card-On-File Initiation
Category | Field | Presence | Comment |
| Circumstance | cardholderVerificationMethod | Mandatory | Indicates how the identity of the cardholder is verified. Possible values: -“Cvv2” -“3DSecure” -“OfflinePin” -“OnlinePin” -“Signature” -“None” |
| scaExemptionCause | Conditional | In some cases, strong customer authentication is not needed. This field describes which exemption/exclusion is applicable for the transaction so that strong customer authentication is not needed. Possible values: -"LowValue” -“LowFraud” -“Delegation” -“TrustedAcceptor” -“SecureCorporate” -“Recurring” -“Mit” -“AuthenticationOutage” | |
| initiatorType | Mandatory | Indicates who has triggered the action. This could either be the cardholder or the merchant (acceptor). In the first case it is a Cardholder Initiated Transaction (CIT) and in the second a Merchant Initiated Transaction (MIT). Possible values: -“Cardholder” -“Acceptor” | |
| credentialStorage | Conditional | Indicates that a successful CIT transaction will result in storage of the card details for later use in card-on-file transactions. May only be used if initiatorType is “Cardholder” | |
| schemeTransactionId | Conditional | The Trace-ID/TID to be presented to the card scheme for a Merchant Initiated Transaction (MIT). It has to be the one returned for the Cardholder Initiated Transaction (CIT) with which the transaction series has been started and only needs to be provided if no other kind of transaction linking is applicable. | |
| mitCause | Conditional | In case no other indicator is applicable, this field states why the merchant triggers or will (later) trigger a transaction without involvement of the cardholder. Can be present for Merchant Initiated Transactions (MIT) and must be present for Cardholder Initiated Transactions (CIT) that start a series of recurring/installment/unscheduled non one-time transactions. Possible values: -“Unscheduled” -“Recurring” -“FixedRecurring” -“Installment” -“Resubmission” -“DelayedCharge” -“Reauthorization” -“NoShow” -“Deferred” -“Increment” | |
| Card | cvv2 | Conditional | Card Verification Code/Card Verification Value printed on the back of the card. |
| entryMode | Conditional | Method used to fetch the card data for the transaction. File has to be used for Merchant Initiated Transactions (MIT). Possible values: | |
| walletId | Conditional | Mastercard identification of the wallet provider (when a wallet is used for the transaction). See the Mastercard documentation for information about the presence of this field. | |
| Token | acceptorId | Conditional | Merchant ID presented to the cardholder at authentication/checkout time. |
| tavvData | Conditional | Token Authentication Verification Value cryptogram data in hex encoding (VISA TAVV or MasterCard DSRP cryptogram). |
In case of SCA exemption, the Accept Transactions API authorization must include in the scaExemptionCause field for which exemptions/exclusion reason is applied.
For transactions in scope of the SCA rule, the issuer decides on the need for SCA. When an acquirer requests authorization without prior SCA, the issuer may decline indicating SCA is needed (response code 65: soft decline). For example, when the acquirer requests SCA exemption for Low Value Payment, the issuer may decline the authorization because the limit is reached of consecutive payments without SCA.
After a soft decline, the merchant should initiate a 3DS authentication request. In this authentication request the merchant should indicate that the SCA is mandated. After successful authentication, the merchant can send a second authorization request. The second authorization request is a new authorization request and not a follow-up on the first authorization request (i.e. the second request makes no reference to the first request).
Disclaimer: The explanation found on this developer portal about SCA and SCA exemptions is not a comprehensive set of rules. Always consult the Card scheme rules for detail on card processing according to SCA-rule and SCA exemptions. Consult the European Banking Authority (EBA) websites for latest PSD II and SCA rules.
Merchant Initiated Transactions
The Accept Transactions API can accept Merchant Initiated Transactions (MIT). MIT are payments initiated by the merchant without the interaction of the payer.
Such payments require that:
- SCA is applied to the first transaction action mandating the Merchant to initiate payment(s) and
- There is an agreement between the payer and the merchant for the provision of products or services and potential costs associated with these. Such payments can happen in the following cases:
- Recurring Payments for fixed or variable amounts
- Merchant funded installments
- The final amount is higher than the amount used at authentication time. This can happen when additional charges are added to the initially agreed amount such as, a minibar in a hotel or fines with a rented car
Acquirers subject to PSD2 SCA are only allowed to apply Merchant-Initiated Transactions (MIT) when:
- The transaction is triggered by the merchant and the cardholder is typically off-session (off-session means the cardholder is no longer interacting with the merchant page or the merchant app), or
- The transaction is triggered by the merchant, as it could not have been triggered by the cardholder during checkout
Some examples:
- The final amount is not known during the checkout (for example, online groceries shopping)
- An event triggered the transaction after the checkout (for example, miscellaneous rental or service charges)
- The transaction is part of a recurring payment arrangement
- The transaction is broken down into different payments happening at different times (for example, installments, travel bookings, market places)
The field initiatorType should be used to indicate if the transaction is merchant initiated or cardholder initiated. If a cardholder initiated transaction is followed by a (series of) merchant initiated transactions, the field mitCause should be used to specify the type of MIT transactions for which the CIT transaction gives a mandate. The MIT-transactions must reference the CIT transaction with the field schemeTransactionId.
The mandatory field cardholderVerificationMethod should be set to "none" in case of a MIT-transaction.
Tokenization
The Accept Transactions API can accept the scheme token in field PAN and scheme dynamic cryptogram in field tavvData.
Card scheme network tokenization is the replacement of the cardholder’s primary account number (PAN) with an alternative number, referred to as a token.
Use of tokens reduces the risk of fraud in case of data breaches as the PANs are no longer stored. Tokens are used in various places such as wallets, but also by merchants who want to store the cardholders credentials (card-on-file). Tokens can be used in eCommerce transactions in the same way PANs are used. The number of digits of a Token is directly related to the number of digit of the PAN, e.g. a 16-digit token is created for a 16 digit PAN.
When used by merchants, tokens are unique to a merchant. To improve security, tokens are accompanied by a dynamic cryptogram (tavvData attribute in the Accept TRX API). Only the correct merchant can request a cryptogram associated with a unique token, and cryptograms may only be used once. The presence of the cryptogram in the authorization request helps the card scheme to verify that the transaction originated from the correct merchant.
Optional Transaction References
To facilitate tracking some additional PSP and merchant transaction references are available.
In case of a Refund the orginalTransactionId of the Purchase should be included to help connect the two transactions.
Request actionType AUTH – Optional transaction references
Category | Field | Presence | Comment |
| Identification | originalTransactionId | Conditional | Identification of the former transaction flow to which this transaction refers to. For example, with a Refund this would refer to the transactionId of Purchase AUTH. |
| pspReference | Optional | PSP’s reference for the transaction | |
| merchantReference | Optional | Merchant’s reference for the transaction. Typically the merchant’s orderId |
Payment Facilitator
In case of a Payment facilitator, the following acceptor fields are scheme mandated to be sent in for an authorization.
Request actionType AUTH - Payment Facilitator mandatory fields
Category | Field | Presence | Comment |
| Acceptor | merchantCategoryCode | Conditional | Only mandatory for Payment Facilitator |
| name | Conditional | Only mandatory for Payment Facilitator | |
| address | Conditional | Only mandatory for Payment Facilitator | |
| postalCode | Conditional | Only mandatory for Payment Facilitator | |
| city | Conditional | Only mandatory for Payment Facilitator | |
| state | Conditional | Only mandatory for Payment Facilitator | |
| countryCode | Conditional | Only mandatory for Payment Facilitator | |
| paymentFacilitatorId | Conditional | Only mandatory for Payment Facilitator | |
| independentSalesOrgId | Conditional | Only mandatory for ISO | |
| subMerchantId | Conditional | Only mandatory for Payment Facilitator or ISO | |
| schemeMerchantId | Conditional | For various reasons, the card scheme may assign a merchant id to the merchant. If that is the case, this field should be present. |
Authorization request response
In an (pre-)authorization response message, the following data elements can be present.
Response fields request actionType AUTH and PREAUTH
Category | Field | Presence | Comment |
| actionId | Mandatory | Echoed from the request | |
| transactionId | Mandatory | Unique identification assigned by Worldline to a transaction. Present in the first action response of a transaction and must be used in all subsequent action requests for the same transaction. | |
| declined | Mandatory | Boolean (true or false) whether the request has been completely declined or not. | |
| declineCause | Conditional | Reason why a request has been declined. Only present when the request has been declined completely. | |
| hints | Optional | Additional information for cardholder and/or merchant regarding transaction outcome and the next step to be taken. Examples of possible values: -‘DuplicateTransmission” -“TryAgainLater” | |
| tryAgainPeriod | Optional | If hints indicates that the merchant may try again later, this field can be present to advice the recommended time interval (in hours) after which at the earliest an additional attempt should be performed. | |
| responder | Mandatory | Indicates the entity which finally determined the outcome of the transaction. Possible values: -“Recipient” : Worldline -“Partner” : main entity (e.g. issuer or card scheme)involved by Worldline in transaction processing | |
| responderDetails | Mandatory | Response code provided by the entity which determined the final outcome of the transaction. In case this entity is Worldline, it is the internal result code of Worldline. This value is only provided for information purpose since the content is subject to change. That is, it must not be evaluated automatically. For decisions made by a partner this field provides the partners response code. For example, when Worldline directly interacts with the card scheme via ISO 8583 it is the DE 39 field content from the returned response message. | |
| paymentAccountReference | Conditional | A Payment Account Reference (PAR) is a unique value associated with a single PAN and attributed to all tokens associated with that PAN. A PAR can be used to link transactions containing PANs or tokens associated with the same underlying payment account. Present if returned by the card scheme. | |
| approvalCode | Conditional | Code assigned by the issuer when the authorization is approved | |
| schemeTransactionId | Conditional | Transaction id assigned by the scheme | |
| cvv2Result | Conditional | Result of the ccv2 verification. Possible values: -“Correct” -“Wrong” -“Unable” -“Omitted” -“Missing” -“Other” -“Unknown” | |
| Financial | responseAmount (amount + currency) | Conditional | Amount for which authorization is granted |
| Card | brand | Mandatory | (Acceptance) brand as derived by Worldline from the Card Number |
Authorization Reversal
The Authorization follow-up actions AUTH_REVERSAL (full reservation amount) and AUTH_REVERSAL_PARTIAL (part reservation amount) are used to reverse the effect of the authorization and release the funds reserved with an authorization request.
After a transaction is captured, the authorization may no longer be reversed. Instead (e.g. customer returns goods) a refund should be used to credit the cardholder.
Cancellation
When a previously requested authorization is no longer needed use an authorization reversal request for the full amount. This is to ensure an accurate open-to-buy balance of the cardholder.
For an Authorization cancellation use the transactionId as identifier for the transaction lifecycle for which the requestor is trying to release the funds.
Technical reversal
When no response is received to an AUTH or PREAUTH action due to a technical reason (e.g. timeout), the requestor should send in a follow-up action to REVERSE (e.g. actions AUTH_REVERSAL) using the original actionType originalActionId (of e.g. original AUTH).
Request actionType AUTH_REVERSAL and AUTH_REVERSAL_PARTIAL
Category | Field | Presence | Comment |
| actionType | Mandatory | Type of action requested. Possible values: -“AUTH_REVERSAL” -“AUTH_REVERSAL_PARTIAL” | |
| reversalCause | Optional | Indicates why the reversal has been triggered by the caller. Reason could be a problem in receiving and validating the response. But there can also be other issues afterwards related to action handling. Possible values: -"ResponseInvalid" -"ResponseTimeout" -"SubsequentlyDeclined" -"ProcessingFailure" | |
| Identification | actionId | Mandatory | Identifier assigned by the caller to the transaction. The provided values must be unique with respect to the requestor. That is, two requests generated by the same requestor must have different identifiers. The only exception is a retry/reattempt where the original value must be taken. The identifier must be in UUID format. |
| originalActionId | Conditional | In case of a technical reason to reverse the authorization request (e.g. timeout), this data element should be used to link to the original authorization request. | |
| transactionId | Mandatory | Unique identification assigned by Worldline to a business transaction. The value from the initial authorization response must be used to populate this field (if the response reached the PSP). | |
| acquirerId | Mandatory | Identification of the acquirer, assigned by Worldline | |
| cardAcceptorId | Mandatory | Identification of the merchant, assigned by acquirer | |
| pspReference | Optional | PSP’s reference for the transaction | |
| Financial | requestAmount (amount + currency) | Mandatory | Amount for which no longer authorization is requested. In case of a technical reversal, this should be the same amount as in the authorization request. In case of a customer cancellation, the amount should be the amount authorized by the issuer (full reversal) or a lower amount (partial reversal). |
| Circumstance | actionDateTime | Mandatory | Date and time in local time zone when the authorization reversal is requested |
Pre-Authorization
The pre-authorization request is sent in using actionType PREAUTH, service Purchase, and the other mandatory & relevant conditional authorization fields described under actionType AUTH.
The actionType PREAUTH must be used when the transaction amount is not known at the time of authorization. Pre-authorizations are typically used in hotel and the car rental sector.
Depending on scheme rules for some brands (e.g. Maestro) pre-authorization should be used when the amount is known at authorization, but the transaction may possibly not be completed for other than technical reasons. For instance, the products ordered by the cardholder may turn out to be out-of-stock.
Extend Pre-Authorization period
For Mastercard Pre-Authorization period (default is 30 days) can be extended with 30 days using an actionType AUTH_INCREMENTAL with requestAmount set to "0". For VISA Pre-Authorization period (default is 30 days) can be extended using an actionType PREAUTH resubmission using MIT with correct mitCause.
Request actionType PREAUTH
Category | Field | Presence | Comment |
| actionType | Mandatory | Type of action requested. Set to: -“PREAUTH” |
(Pre-)Authorization incremental
The pre-authorization amount can be increased by sending in an follow-up request using the actionType AUTH_INCREMENTAL, the transactionId (lifecycle) from the initial PRE_AUTH request response, the additional requestAmount and the other mandatory fields of the AUTH actionType. For example, a hotel may need to increase the authorization amount due to minibar usage or a 1 day longer stay.
If the Purchase is later CAPTURED, the capture requestAmount must not exceed the accumulated authorization amount.
Extend Pre-Authorization period
For Mastercard Pre-Authorization period (default is 30 days) can be extended with 30 days using an actionType AUTH_INCREMENTAL with requestAmount set to "0". For VISA Pre-Authorization period (default is 30 days) can be extended using an actionType PREAUTH resubmission using MIT with correct mitCause.
Request actionType AUTH_INCREMENTAL
Category | Field | Presence | Comment |
| actionType | Mandatory | Type of action requested. Set to: -“AUTH_INCREMENTAL” | |
| Identification | actionId | Mandatory | Identifier assigned by the caller to the transaction. The provided values must be unique with respect to the requestor. That is, two requests generated by the same requestor must have different identifiers. The only exception is a retry/reattempt where the original value must be taken. The identifier must be in UUID format. |
| transactionId | Mandatory | Unique identification assigned by Worldline to a business transaction. The value from the initial authorization response must be used to populate this field (if the response reached the PSP). | |
| acquirerId | Mandatory | Identification of the acquirer, assigned by Worldline | |
| cardAcceptorId | Mandatory | Identification of the merchant, assigned by acquirer | |
| pspReference | Optional | PSP’s reference for the transaction | |
| Financial | requestAmount (amount + currency) | Mandatory | Additional amount for which pre-authorization incremental is requested |
Authorization and Capture
In some cases such as with a Refund the Merchant may want to request both Authorization and Capture steps at the same time.
The request must then include the actionType “AUTH_AND_CAPTURE”, and the other mandatory and conditional authorization fields described under actionType AUTH.
Request actionType AUTH_AND_CAPTURE fields
Category | Field | Presence | Comment |
| actionType | Mandatory | Type of action requested. Set to: -“AUTH_AND_CAPTURE” | |
| service | Mandatory | Service requested. The follow-up actions must have the same value as the initial action. Possible values: -"Purchase" -“Refund” |
Account Verification
The account verification service (or account status inquiry as it is called by Mastercard) can be used to check that the cardholders account is open and can be used for future transactions. The account verification has no financial impact, i.e. no funds are reserved (requestAmount is absent).
The merchant must send in an request with actionType “AUTH”, service “AccountVerification”, the “requestAmount” left out, and the other mandatory and conditional authorization fields described under actionType AUTH.
The account verification can be used in various situations but is also often used when not only the status of the account is checked but also the cardholder needs to be authenticated such as:
- To establish a recurring or bill payment relationship
- To store the cardholder’s credential on file for use in future transaction
Disclaimer
The Open API specification is leading for integrations purposes. The Accept Transactions API documentation provides guidance on what is to be sent in for a particular transaction acceptance request (use case, action, brand, MCC, etc.).
The developer portal documentation does not provide a comprehensive set of rules and regulations on what request call body to send into the Accept Transactions API. To stay compliant and avoid data integrity issues, always consult the Card scheme processing rules. In addition, always consult your regulatory rules and regulations (for example consult the European Banking Authority websites for latest PSD II and SCA rules).
Accept Transactions API doc
Accept Transactions (v1.0.3)
This API enables you to Accept transactions for your Merchant customers.
Transactions are accepted via a host-to-host connection between the API user and Worldline FS API GateWay. The Worldline FS API GateWay is connected to the Worldline FS acceptance host, which in turn is connected to the Issuer network.
There is 1 POST Transaction request call and 1 POST Transaction request response field set.
How to use acceptance actions?
Each POST transaction request actionType is a partial on the full Transaction request field set. The POST Transaction request mandatory parameters depend on the actionType the user is requesting as explained in the specifications.
A valid POST transaction request must include:
- the unique actionId in UUID format;
- the minimum mandatory fields to perform a basic actionType (AUTH, CAPTURE etc.) for the service (e.g. Account Verification, Purchase, Refund);
- if applicable, include Additional data (e.g. Card-On-File, MCC specifics such as Additional Merchant data and Airline Addendum..).
A follow-up action such as a CAPTURE must also include the transactionId (lifecycle) returned by the Worldline FS host in the approved initial authorization (AUTH and PREAUTH actionType) request response. Exception is a technical reversal (e.g. timeout) as explained in actionType AUTH_REVERSAL where only the originalActionId is available.
The illustration below shows examples of a happy flow (resulting in a paid transaction) from the POST Transaction in Accept Transactions API through the various transactionStates in the GET Transactions API.
Flow actions and transactionStates in APIs

For Purchase and Refund services available actions are:
- AUTH
- AUTH_REVERSAL
- CAPTURE
- AUTH_AND_CAPTURE
- CAPTURE_SPLIT (partial capture)
Actions under development are:
- PREAUTH
- AUTH_REVERSAL_PARTIAL
- AUTH_INCREMENTAL
Actions on the roadmap are:
- AUTH_UPDATE
- PAYOUT (OCT)
actionType definitions
actionType | definition |
| AUTH | The Authorization (final) message reserves the cardholder amount with Issuer bank. |
| AUTH_REVERSAL | This is used to release the funds RESERVED on the cardholders’ account as a result of an APPROVED AUTHORIZATION. You must not use this follow-up action (operation) if you have already sent a CAPTURE on the transaction. |
| PREAUTH | A PREAUTH reservation at Issuer bank is made when the final purchase amount is not yet known. Example is the amount reserved at hotel check-in for 2 day stay, before mini-bar usage has been take into account. |
| AUTH_INCREMENTAL | Adjusts the pre-authorized amount up. An incremental is a pre-authorization exclusive follow-up action (operation) that can be sent if the final amount is higher than the previously pre-authorized amount. Later on when capturing the transaction you must specify the last correct amount. |
| AUTH_REVERSAL_PARTIAL | Adjusts the pre-authorized amount down. A partial reversal is a pre-authorization exclusive follow-up action (operation) that can be sent to reverse parts of the pre-authorized amount. |
| AUTH_AND_CAPTURE | This action type Triggers card Dual message actionTypes “AUTH” and “CAPTURE”. This action can be used for Service "Purchase" and Service “Refund”. For this action no cancellation is available. |
| AUTH_AND_CAPTURE_REVERSAL | This actionType triggers a technical reversal on an actionType AUTH_AND_CAPTURE for service "Purchase" or "Refund" e.g. in case of a time-out. Due to current limitations, this actionType always triggers in clearing a PRESENTMENT_REVERSAL. In case the PRESENTMENT and PRESENTMENT_REVERSAL are in the same clearing batch, they are not sent out to scheme. Alternately, idempotency can be used; this is on the API roadmap. |
| CAPTURE | In CNP a CAPTURE follow-up action (operation) needs to be sent in by the API user so that the Back Office can CLEAR the transaction. Note: In POS the HOST sends in the CAPTURE (Advice) after the terminal has sent in the COMPLETION action on a purchase so the Back Office can clear the transaction. There are time limits between the original action (operation) and the last capture that depends on whether the original action (operation) was an authorization or a pre-authorization: NOTE: VISA does not allow estimated amounts/incremental for all MCCs. Please consult the scheme rules for more information. |
| CAPTURE_SPLIT | A CAPTURE can be split into multiple partial CAPTURES e.g. in case the goods are delivered at multiple intervals in time. Each partial CAPTURE must contain the sequenceNumber. By the last partial CAPTURE it is mandated to send in the sequenceCount of the number of Partial Captures. |
Example transaction request actionType AUTH for Mastercard
{
  "actionType": "AUTH",
  "service": "Purchase",
  "identification": {
    "requestorId": "1157",
    "actionId": "e9bd7129-7377-4d1a-9c91-5abdfeaba145",
    "acquirerId": "315000001",
    "cardAcceptorId": "90100110"
  },
  "financial": {
    "requestAmount": {
      "amount": "23.32",
      "currency": "EUR"
    }
  },
  "circumstance": {
    "actionDateTime": "2022-07-28T13:06:12+02:00",
    "channel": "ECommerce"
  },
  "acceptor": {
    "merchantCategoryCode": "7999",
    "name": "Home Festival",
    "address": "Eendrachtslaan 315",
    "postalCode": "3526LB",
    "city": "Utrecht",
    "state": "NL",
    "countryCode": "NLD"
  },
  "card": {
    "cardNumber": "5413330089600010",
    "expiryDate": "2512"
  },
  "3DSecure": {
    "result": "Full",
    “dsTransactionId”: "4c754b56-c6c0-468b-bfc9-905ceab69618"
    “version”: "V2"
    “authenticationValue”: "lChDPlIS2WTc/PNfk0LoeYI/hYy="
    “dsEci”: "02"
    “subversion”: "2"
  }
}
Disclaimer
The Open API specification is leading for integrations purposes. The Accept Transactions API documentation provides guidance on what is to be sent in for a particular transaction acceptance request (use case, action, brand, MCC, etc.).
The developer portal documentation does not provide a comprehensive set of rules and regulations on what request call body to send into the Accept Transactions API. To stay compliant and avoid data integrity issues, always consult the Card scheme processing rules. In addition, always consult your regulatory rules and regulations (for example consult the European Banking Authority websites for latest PSD II and SCA rules).
Summary of resources
The data model used in our system is represented as follows :
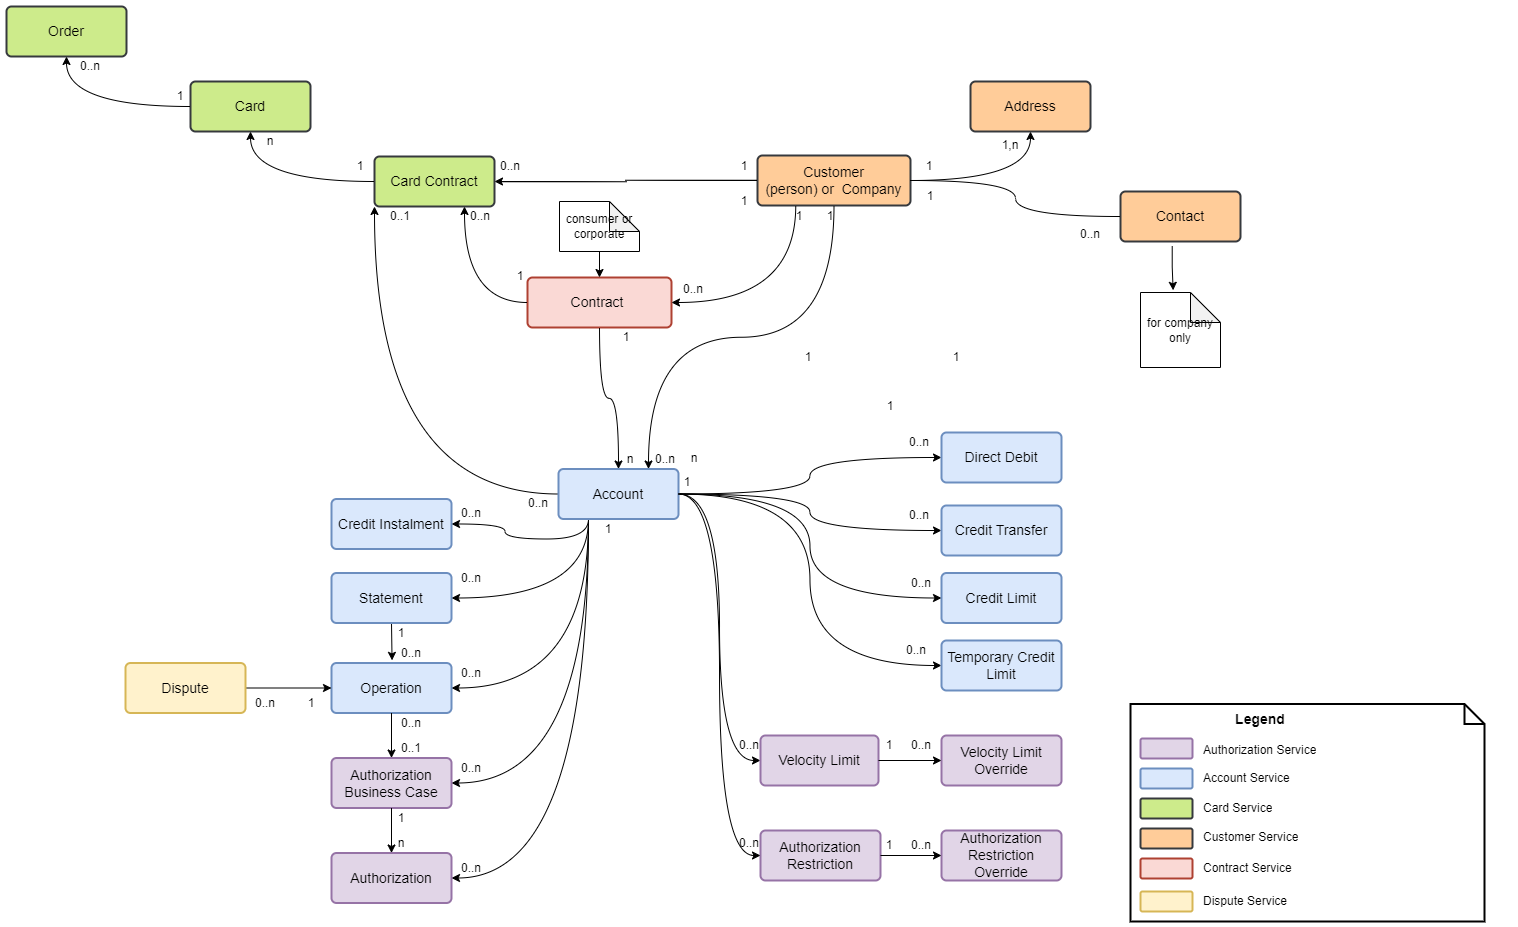
The different resources are described below :
Accounts manage monetary operations, balances and restrictions, and are typically assigned to account owners. An account owner is typically an individual, or a legal entity, who has signed a contract with an issuing institution, so a customer.
Accounts are used to process operations, manage a balance in a dedicated currency, control the credit risk, perform transaction charging, calculate interests (credit or debit), generate an invoice (statement), process payments.
A customer address is the generic term for postal address, email address or phone number. Addresses can be of two types, personal address or company address, and could be used in several ways according to the purpose for which the address is used, as example for statement sending or card delivery.
Authorizations are request message from a connected scheme which are processed by our authorization server. Based on several business rules (e.g. card status, velocity limits check ...) the authorizations could either be accepted or declined.
An authorization business case can refer to one or several consecutive Authorizations (for example, a reservation in a hotel with a subsequent confirmation or a purchase with a subsequent cancellation).
The card usage can be restricted using multiple criteria, such as transaction type (ecom, ATM), acceptance domain (allowed regions), active start and end date.
Authorization Restriction Override ➔
Restrictions are either enabled or disabled by default and can be overridden.
A customer is a person or a company who has subscribed to services offered by the issuer.
Contract refers to the Customer contracts created in our solution. The contract is the link between cards, accounts and customer data. The contract inherits default value from Product with the possibility to override some specific parameters, such as fees, terms and conditions, credit limit, card layout reference.
A Card Contract represents a single card owner by a cardholder and is linked to a card profile which defines all allowed business rules (e.g. replacement, renewal) and card properties (e.g. chip data) required to create a card. Under a card contract the first card is created and all next cards in case of automatic renewals, card replacements.
A card is a payment mean that enables a customer to access funds or make purchases against a line of credit. Cards can have different technologies (EMV, Magnetic Stripe, Contactless), could be physical or virtual.
An order refers to card order and PIN mailer data extractions that are sent to card producer and PIN mailer editors respectively.
Operations can be transactions received from clearing or internal generated operations ( e.g. fees, refund, chargeback...) that are posted on accounts.
A temporary credit limit, that extends or reduces the account credit limit could be defined at account level. In this case, the value of the temporary limit override the content of the normal credit limit.
The velocity limit is a restriction based on usage frequency and the total amount on the card account. The purpose of a velocity limit is to limit a transaction in terms of amount and frequency, e.g. it might be allowed to withdraw 500€ per day on POS terminals in Europe.
On account level the defaults can be overridden. Overriding can be timely restricted by providing an activation period.
The different resources are identified by corresponding references.
References can be internal, which means generated by our system and transmitted to the issuer.
WL supports also the usage of external references that means the bank provides us the value; this implies that the generation of this identifier follows rules shared by WL (unicity of the reference).
External references must be provided generally during the resource generation such as for:
-
External contract reference during contract creation
-
External card reference during card creation
-
External account reference during account creation
Please find below a table illustrating the resources for which external reference is allowed.
