Bank Selection Interface

for Payment

API Reference Live Demonstration

The Bank Selection Interface provides a set of white-labeled screens that support the payer's bank selection and the interactions required for certain authorization flows. It can be used by setting the field 'UseAuthorisationLandingPages=true' in the Payment Initiation Request. The Bank Selection Interface simplifies the integration effort.

Screen examples

The screens below provide an impression of a possible payment flow supported by the Bank Selection Interface, with screens 2, 3, and 6 supplied by the Bank Selection Interface. It is a white-labeled solution, and the style of the pages can be customized.

Screen 1: Checkout page as part of your software

As part of payment preparation and depending on the payment context, you might present the shopping cart or details of the supplier invoice that needs to be paid. There should be a 'Pay' button, which, when clicked, will launch the Bank Selection Interface. 

Screen 1

Screen 2: Bank Selection Interface - payer's bank selection

This screen becomes visible after the payer has been redirected to the Bank Selection Interface. If a bank ID was provided in the Post Payments API, the bank would have been pre-filled.

Screen 2

After payer's bank is selected the progress on the left bar changes. In this example, the selected bank does not require additional data to continue with the payment. 

Whenever the payer's bank require additional information (e.g., the payer's IBAN) prior to payment initiation, the end user will see an additional screen where they will be prompted to provide the necessary information. This extra step is completely managed by Worldline and does not require any additional integration effort on your part.

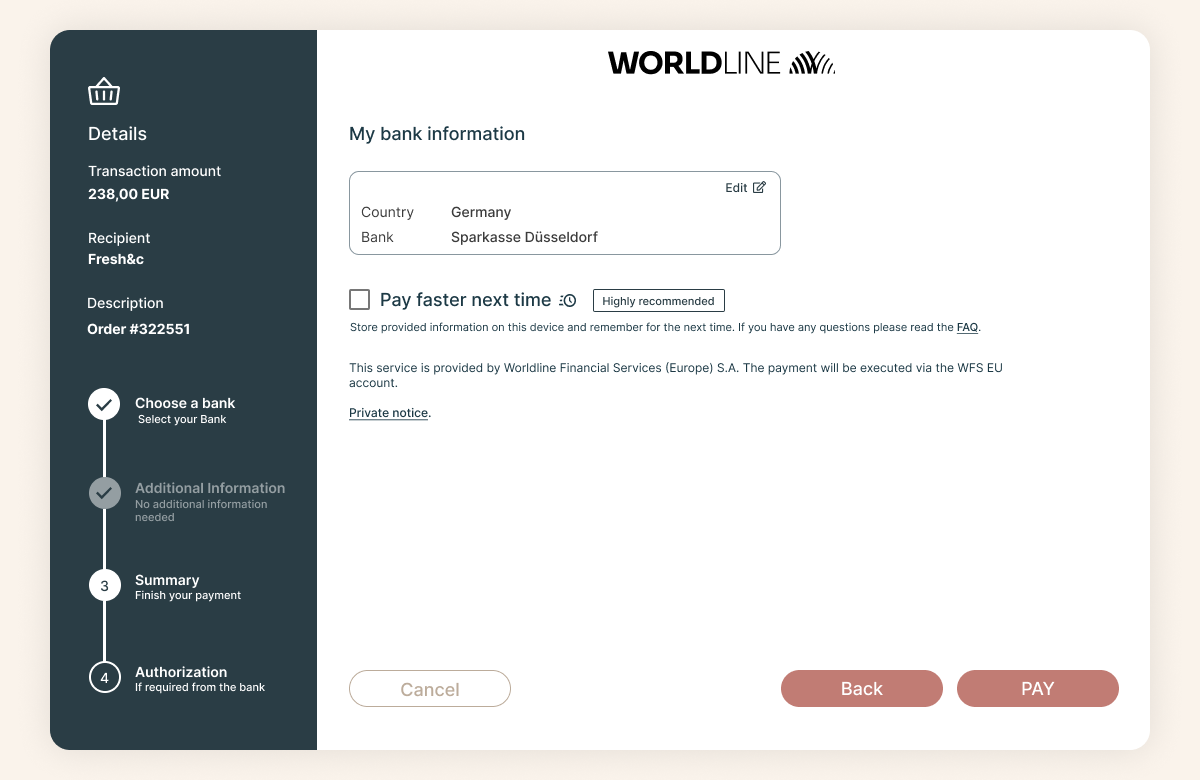
Screen 3: Bank Selection Interface - summary page

On the summary page, the payer reviews the data and can choose to save their bank preferences in a browser cookie. The "Pay" button can be pressed to continue the flow.

Screen 3

Screen 4: Banking portal - payer's authentication

The payer needs to authenticate themselves with their bank and approve the payment. Here is an example of what a bank's authentication screen could look like:

Screen 4

Screen 5: Banking portal -payment authorization

Here is an example of what a bank's payment authorization screen could look like.

Screen 5

Screen 6: Bank Selection Interface - receipt page

Once the payment has been authorized by the payer, the bank will redirect them to the Bank Selection Interface. At this stage, the Bank Selection Interface checks the status of the payment and will display this screen if the payment was successful.

Screen 6

Customisation

Almost all elements can be customized to match your branding, including the left bar, the title, and all buttons. Here is an example of a payment summary page with customized branding:

Customisation example

The summary screen can also be configured to include a terms and conditions checkbox that must be checked before the 'Pay' button can be pressed.

Flow Example

The green vertical bars indicate who is responsible for the interaction with the end user (PSU), while the numbers refer to the example screens mentioned above.

Sequence diagram Bank Selection Interface

Implementation

To initiate a payment using the Bank Selection Interface, the following functions should be implemented:

  • Retrieve Token: An API to retrieve a token, which is used in the subsequent API requests
  • Single Payment: An API to initiate a single payment. Use 'UseAuthorisationLandingPages=true' in the Header
  • Payment Status: An API to request the status of a payment. Or Push Notification: An API that allows you to receive notifications when there is a payment status update.
Enable "on this page" menu on doc section
On