API version 2.37.1
Release Notes: Recent Update
Version 2.36.1 to 2.37.1
What's New
GET /issuers/{issuerId}/transactions/{transactionId}/dispute
Get the dispute information of the transaction
The API returns the dispute folder information if the transaction identified by its transaction Identifier is disputed. If so, it provides access to the full dispute content, including:
- General dispute folder details such as the dispute reason and status
- Cardholder information including card status and billing amount
- The issuer accounting balance
- Transaction details including the reconciliation amount, transaction type, and merchant information The response may also be enriched (when embed fields are specified in the input) with additional data related to added events, performed postings, attached documents, and messages exchanged with the scheme, representing the dispute cycle history. If the transaction is not disputed, a 404 response code is returned along with a status message indicating that no Dispute Folder has been found.
What's Deprecated
GET /issuers/{issuerId}/operations/{externalOperationReference}/dispute
Get the dispute information of the operation identified by external operation reference
This API can be used but will no longer evolve. It is recommended to use the 'Get the dispute information of the transaction' API (GET /issuers/{issuerId}/transactions/{transactionId}/dispute). The API returns the dispute folder information if the transaction identified by an operation Identifier is disputed. If so, it provides access to the dispute content, including:
- General dispute folder details such as the dispute reason and status
- Cardholder information including card status and billing amount
- The issuer accounting balance
- Transaction details including the reconciliation amount, transaction type, and merchant information The response may also be enriched (when embed fields are specified in the input) with additional data related to added events, performed postings, attached documents, and scheme messages, representing the dispute cycle history. If the transaction is not disputed, a 404 response code is returned along with a status message indicating that no Dispute Folder has been found.
What's Changed
GET /issuers/{issuerId}/transactions/{transactionId}
Response:
- Changed property data (object Transaction)
- Added property authorized (boolean)
- Added property creationDate (string)
- Added property rejected (boolean)
- Added property approvalResponseCode (string)
- Added property settlementDate (string)
- Added property embargoCheckCode (string)
- Added property interchangeFees (array)
- Added property disputeReason (string)
GET /issuers/{issuerId}/cards/external-cards/{issuerCardExternalReference}/orders/{orderReference}
Response:
- Changed property data (object Order)
- Changed property card (object Card)
- Changed property cardContract (object CardContract)
- Added property schemeReportDeclarationBehavior (string)
- Added property commercialProductReference (string)
- Added property commercialProductDescription (string)
- Changed property cards (array)
- Changed items (object Card)
- Changed property cardContract (object CardContract)
- Added property schemeReportDeclarationBehavior (string)
- Added property commercialProductReference (string)
- Added property commercialProductDescription (string)
- Changed property cardContract (object CardContract)
- Changed items (object Card)
- Changed property orders (array)
- Changed items (object Order)
- Changed property card (object Card)
- Changed property cardContract (object CardContract)
- Added property schemeReportDeclarationBehavior (string)
- Added property commercialProductReference (string)
- Added property commercialProductDescription (string)
- Changed property cardContract (object CardContract)
- Changed property card (object Card)
- Changed items (object Order)
- Changed property cardContract (object CardContract)
- Changed property card (object Card)
GET /issuers/{issuerId}/cards/{cardReference}/orders/{orderReference}
Parameters:
Changed: embed in query
Response:
- Changed property data (object Order)
- Changed property card (object Card)
- Changed property cardContract (object CardContract)
- Added property schemeReportDeclarationBehavior (string)
- Added property commercialProductReference (string)
- Added property commercialProductDescription (string)
- Changed property cards (array)
- Changed items (object Card)
- Changed property cardContract (object CardContract)
- Added property schemeReportDeclarationBehavior (string)
- Added property commercialProductReference (string)
- Added property commercialProductDescription (string)
- Changed property cardContract (object CardContract)
- Changed items (object Card)
- Changed property orders (array)
- Changed items (object Order)
- Changed property card (object Card)
- Changed property cardContract (object CardContract)
- Added property schemeReportDeclarationBehavior (string)
- Added property commercialProductReference (string)
- Added property commercialProductDescription (string)
- Changed property cardContract (object CardContract)
- Changed property card (object Card)
- Changed items (object Order)
- Changed property cardContract (object CardContract)
- Changed property card (object Card)
GET /issuers/{issuerId}/operations/{externalOperationReference}/dispute
POST /search-transactions
Request body :
- Added property transactionAmountFrom (object)
- Added property transactionAmountTo (object)
Response:
- Changed property data (array)
- Changed items (object Transaction)
- Added property authorized (boolean)
- Added property creationDate (string)
- Changed items (object Transaction)
GET /issuers/{issuerId}/cards/external-cards/{issuerCardExternalReference}
Response:
- Changed property data (object Card)
- Changed property cardContract (object CardContract)
- Added property schemeReportDeclarationBehavior (string)
- Added property commercialProductReference (string)
- Added property commercialProductDescription (string)
- Changed property cards (array)
- Changed items (object Card)
- Changed property cardContract (object CardContract)
- Added property schemeReportDeclarationBehavior (string)
- Added property commercialProductReference (string)
- Added property commercialProductDescription (string)
- Changed property cardContract (object CardContract)
- Changed items (object Card)
- Changed property orders (array)
- Changed items (object Order)
- Changed property card (object Card)
- Changed property cardContract (object CardContract)
- Added property schemeReportDeclarationBehavior (string)
- Added property commercialProductReference (string)
- Added property commercialProductDescription (string)
- Changed property cardContract (object CardContract)
- Changed property card (object Card)
- Changed items (object Order)
- Changed property cardContract (object CardContract)
GET /issuers/{issuerId}/cards/external-cards/{issuerCardExternalReference}/orders
Response:
- Changed property data (array)
- Changed items (object Order)
- Changed property card (object Card)
- Changed property cardContract (object CardContract)
- Added property schemeReportDeclarationBehavior (string)
- Added property commercialProductReference (string)
- Added property commercialProductDescription (string)
- Changed property cards (array)
- Changed items (object Card)
- Changed property cardContract (object CardContract)
- Added property schemeReportDeclarationBehavior (string)
- Added property commercialProductReference (string)
- Added property commercialProductDescription (string)
- Changed property cardContract (object CardContract)
- Changed items (object Card)
- Changed property cardContract (object CardContract)
- Changed property card (object Card)
- Changed items (object Order)
GET /issuers/{issuerId}/cards/{cardReference}
Response:
- Changed property data (object Card)
- Changed property cardContract (object CardContract)
- Added property schemeReportDeclarationBehavior (string)
- Added property commercialProductReference (string)
- Added property commercialProductDescription (string)
- Changed property cards (array)
- Changed items (object Card)
- Changed property cardContract (object CardContract)
- Added property schemeReportDeclarationBehavior (string)
- Added property commercialProductReference (string)
- Added property commercialProductDescription (string)
- Changed property cardContract (object CardContract)
- Changed items (object Card)
- Changed property orders (array)
- Changed items (object Order)
- Changed property card (object Card)
- Changed property cardContract (object CardContract)
- Added property schemeReportDeclarationBehavior (string)
- Added property commercialProductReference (string)
- Added property commercialProductDescription (string)
- Changed property cardContract (object CardContract)
- Changed property card (object Card)
- Changed items (object Order)
- Changed property cardContract (object CardContract)
GET /issuers/{issuerId}/cards/{cardReference}/orders
Response:
- Changed property data (array)
- Changed items (object Order)
- Changed property card (object Card)
- Changed property cardContract (object CardContract)
- Added property schemeReportDeclarationBehavior (string)
- Added property commercialProductReference (string)
- Added property commercialProductDescription (string)
- Changed property cards (array)
- Changed items (object Card)
- Changed property cardContract (object CardContract)
- Added property schemeReportDeclarationBehavior (string)
- Added property commercialProductReference (string)
- Added property commercialProductDescription (string)
- Changed property cardContract (object CardContract)
- Changed items (object Card)
- Changed property cardContract (object CardContract)
- Changed property card (object Card)
- Changed items (object Order)
PATCH /issuers/{issuerId}/card-contracts/external-card-contracts/{issuerCardContractExternalReference}
Request body :
- Added property schemeReportDeclarationBehavior (string)
GET /issuers/{issuerId}/card-contracts/external-card-contracts/{issuerCardContractExternalReference}
Response:
- Changed property data (object CardContract)
- Added property schemeReportDeclarationBehavior (string)
- Added property commercialProductReference (string)
- Added property commercialProductDescription (string)
- Changed property cards (array)
- Changed items (object Card)
- Changed property cardContract (object CardContract)
- Added property schemeReportDeclarationBehavior (string)
- Added property commercialProductReference (string)
- Added property commercialProductDescription (string)
- Changed property orders (array)
- Changed items (object Order)
- Changed property card (object Card)
- Changed property cardContract (object CardContract)
- Added property schemeReportDeclarationBehavior (string)
- Added property commercialProductReference (string)
- Added property commercialProductDescription (string)
- Changed property cardContract (object CardContract)
- Changed property card (object Card)
- Changed items (object Order)
- Changed property cardContract (object CardContract)
- Changed items (object Card)
GET /issuers/{issuerId}/card-contracts/external-card-contracts/{issuerCardContractExternalReference}/cards
Response:
- Changed property data (array)
- Changed items (object Card)
- Changed property cardContract (object CardContract)
- Added property schemeReportDeclarationBehavior (string)
- Added property commercialProductReference (string)
- Added property commercialProductDescription (string)
- Changed property orders (array)
- Changed items (object Order)
- Changed property card (object Card)
- Changed property cardContract (object CardContract)
- Added property schemeReportDeclarationBehavior (string)
- Added property commercialProductReference (string)
- Added property commercialProductDescription (string)
- Changed property cardContract (object CardContract)
- Changed property card (object Card)
- Changed items (object Order)
- Changed property cardContract (object CardContract)
- Changed items (object Card)
PATCH /issuers/{issuerId}/card-contracts/{cardContractReference}
Request body :
- Added property schemeReportDeclarationBehavior (string)
GET /issuers/{issuerId}/card-contracts/{cardContractReference}
Response:
- Changed property data (object CardContract)
- Added property schemeReportDeclarationBehavior (string)
- Added property commercialProductReference (string)
- Added property commercialProductDescription (string)
- Changed property cards (array)
- Changed items (object Card)
- Changed property cardContract (object CardContract)
- Added property schemeReportDeclarationBehavior (string)
- Added property commercialProductReference (string)
- Added property commercialProductDescription (string)
- Changed property orders (array)
- Changed items (object Order)
- Changed property card (object Card)
- Changed property cardContract (object CardContract)
- Added property schemeReportDeclarationBehavior (string)
- Added property commercialProductReference (string)
- Added property commercialProductDescription (string)
- Changed property cardContract (object CardContract)
- Changed property card (object Card)
- Changed items (object Order)
- Changed property cardContract (object CardContract)
- Changed items (object Card)
GET /issuers/{issuerId}/card-contracts/{cardContractReference}/cards
Response:
- Changed property data (array)
- Changed items (object Card)
- Changed property cardContract (object CardContract)
- Added property schemeReportDeclarationBehavior (string)
- Added property commercialProductReference (string)
- Added property commercialProductDescription (string)
- Changed property orders (array)
- Changed items (object Order)
- Changed property card (object Card)
- Changed property cardContract (object CardContract)
- Added property schemeReportDeclarationBehavior (string)
- Added property commercialProductReference (string)
- Added property commercialProductDescription (string)
- Changed property cardContract (object CardContract)
- Changed property card (object Card)
- Changed items (object Order)
- Changed property cardContract (object CardContract)
- Changed items (object Card)
POST /issuers/{issuerId}/cards/external-cards/{issuerCardExternalReference}/block-and-replace
Request body :
- Changed property replaceCardRequest (object ReplaceCardRequest)
- Changed property cardContract (object ReplaceCardRequest.CardContract)
- Added property schemeReportDeclarationBehavior (string)
- Added property forcedEmbossingName (string)
- Added property forcedEmbossingName2ndLine (string)
- Changed property cardContract (object ReplaceCardRequest.CardContract)
GET /issuers/{issuerId}/cards/external-cards/{issuerCardExternalReference}/card-contract
Response:
- Changed property data (object CardContract)
- Added property schemeReportDeclarationBehavior (string)
- Added property commercialProductReference (string)
- Added property commercialProductDescription (string)
- Changed property cards (array)
- Changed items (object Card)
- Changed property cardContract (object CardContract)
- Added property schemeReportDeclarationBehavior (string)
- Added property commercialProductReference (string)
- Added property commercialProductDescription (string)
- Changed property orders (array)
- Changed items (object Order)
- Changed property card (object Card)
- Changed property cardContract (object CardContract)
- Added property schemeReportDeclarationBehavior (string)
- Added property commercialProductReference (string)
- Added property commercialProductDescription (string)
- Changed property cardContract (object CardContract)
- Changed property card (object Card)
- Changed items (object Order)
- Changed property cardContract (object CardContract)
- Changed items (object Card)
POST /issuers/{issuerId}/cards/external-cards/{issuerCardExternalReference}/replace
Request body :
- Changed property cardContract (object ReplaceCardRequest.CardContract)
- Added property schemeReportDeclarationBehavior (string)
- Added property forcedEmbossingName (string)
- Added property forcedEmbossingName2ndLine (string)
POST /issuers/{issuerId}/cards/search
Response:
- Changed property data (array)
- Changed items (object Card)
- Changed property cardContract (object CardContract)
- Added property schemeReportDeclarationBehavior (string)
- Added property commercialProductReference (string)
- Added property commercialProductDescription (string)
- Changed property orders (array)
- Changed items (object Order)
- Changed property card (object Card)
- Changed property cardContract (object CardContract)
- Added property schemeReportDeclarationBehavior (string)
- Added property commercialProductReference (string)
- Added property commercialProductDescription (string)
- Changed property cardContract (object CardContract)
- Changed property card (object Card)
- Changed items (object Order)
- Changed property cardContract (object CardContract)
- Changed items (object Card)
POST /issuers/{issuerId}/cards/{cardReference}/block-and-replace
Request body :
- Changed property replaceCardRequest (object ReplaceCardRequest)
- Changed property cardContract (object ReplaceCardRequest.CardContract)
- Added property schemeReportDeclarationBehavior (string)
- Added property forcedEmbossingName (string)
- Added property forcedEmbossingName2ndLine (string)
- Changed property cardContract (object ReplaceCardRequest.CardContract)
GET /issuers/{issuerId}/cards/{cardReference}/card-contract
Response:
- Changed property data (object CardContract)
- Added property schemeReportDeclarationBehavior (string)
- Added property commercialProductReference (string)
- Added property commercialProductDescription (string)
- Changed property cards (array)
- Changed items (object Card)
- Changed property cardContract (object CardContract)
- Added property schemeReportDeclarationBehavior (string)
- Added property commercialProductReference (string)
- Added property commercialProductDescription (string)
- Changed property orders (array)
- Changed items (object Order)
- Changed property card (object Card)
- Changed property cardContract (object CardContract)
- Added property schemeReportDeclarationBehavior (string)
- Added property commercialProductReference (string)
- Added property commercialProductDescription (string)
- Changed property cardContract (object CardContract)
- Changed property card (object Card)
- Changed items (object Order)
- Changed property cardContract (object CardContract)
- Changed items (object Card)
POST /issuers/{issuerId}/cards/{cardReference}/replace
Request body :
- Changed property cardContract (object ReplaceCardRequest.CardContract)
- Added property schemeReportDeclarationBehavior (string)
- Added property forcedEmbossingName (string)
- Added property forcedEmbossingName2ndLine (string)
POST /issuers/{issuerId}/contracts/create-consumer-contract
Request body :
- Changed property addCardsAccounts (object CreateConsumerContractRequest.AddCardsAccounts)
- Changed property cardContracts (array)
- Changed items (object CreateConsumerContractRequest.CardContract)
- Added property schemeReportDeclarationBehavior (string)
- Changed items (object CreateConsumerContractRequest.CardContract)
- Changed property cardContracts (array)
POST /issuers/{issuerId}/contracts/external-contracts/{issuerContractExternalReference}/add-cards-accounts
Request body :
- Changed property cardContracts (array)
- Changed items (object CreateConsumerContractRequest.CardContract)
- Added property schemeReportDeclarationBehavior (string)
- Changed items (object CreateConsumerContractRequest.CardContract)
POST /issuers/{issuerId}/contracts/{contractReference}/add-cards-accounts
Request body :
- Changed property cardContracts (array)
- Changed items (object CreateConsumerContractRequest.CardContract)
- Added property schemeReportDeclarationBehavior (string)
- Changed items (object CreateConsumerContractRequest.CardContract)
GET /issuers/{issuerId}/accounts/external-accounts/{issuerAccountExternalReference}/contract
Response:
- Changed property data (object Contract)
- Changed property cardContracts (array)
- Changed items (object CardContract)
- Added property schemeReportDeclarationBehavior (string)
- Added property commercialProductReference (string)
- Added property commercialProductDescription (string)
- Changed property cards (array)
- Changed items (object Card)
- Changed property cardContract (object CardContract)
- Added property schemeReportDeclarationBehavior (string)
- Added property commercialProductReference (string)
- Added property commercialProductDescription (string)
- Changed property orders (array)
- Changed items (object Order)
- Changed property card (object Card)
- Changed property cardContract (object CardContract)
- Changed property card (object Card)
- Changed items (object Order)
- Changed property cardContract (object CardContract)
- Changed items (object Card)
- Changed items (object CardContract)
- Changed property cardContracts (array)
- Added property schemeReportDeclarationBehavior (string)
- Added property commercialProductReference (string)
- Added property commercialProductDescription (string)
GET /issuers/{issuerId}/accounts/{accountReference}/contract
Response:
- Changed property data (object Contract)
- Changed property cardContracts (array)
- Changed items (object CardContract)
- Added property schemeReportDeclarationBehavior (string)
- Added property commercialProductReference (string)
- Added property commercialProductDescription (string)
- Changed property cards (array)
- Changed items (object Card)
- Changed property cardContract (object CardContract)
- Added property schemeReportDeclarationBehavior (string)
- Added property commercialProductReference (string)
- Added property commercialProductDescription (string)
- Changed property orders (array)
- Changed items (object Order)
- Changed property card (object Card)
- Changed property cardContract (object CardContract)
- Changed property card (object Card)
- Changed items (object Order)
- Changed property cardContract (object CardContract)
- Changed items (object Card)
- Changed items (object CardContract)
- Changed property cardContracts (array)
- Added property schemeReportDeclarationBehavior (string)
- Added property commercialProductReference (string)
- Added property commercialProductDescription (string)
GET /issuers/{issuerId}/card-contracts
Response:
- Changed property data (array)
- Changed items (object CardContract)
- Added property schemeReportDeclarationBehavior (string)
- Added property commercialProductReference (string)
- Added property commercialProductDescription (string)
- Changed property cards (array)
- Changed items (object Card)
- Changed property cardContract (object CardContract)
- Added property schemeReportDeclarationBehavior (string)
- Added property commercialProductReference (string)
- Added property commercialProductDescription (string)
- Changed property orders (array)
- Changed items (object Order)
- Changed property card (object Card)
- Changed property cardContract (object CardContract)
- Added property schemeReportDeclarationBehavior (string)
- Added property commercialProductReference (string)
- Added property commercialProductDescription (string)
- Changed property cardContract (object CardContract)
- Changed property card (object Card)
- Changed items (object Order)
- Changed property cardContract (object CardContract)
- Changed items (object Card)
- Changed items (object CardContract)
GET /issuers/{issuerId}/card-contracts/external-card-contracts/{issuerCardContractExternalReference}/contract
Response:
- Changed property data (object Contract)
- Changed property cardContracts (array)
- Changed items (object CardContract)
- Added property schemeReportDeclarationBehavior (string)
- Added property commercialProductReference (string)
- Added property commercialProductDescription (string)
- Changed property cards (array)
- Changed items (object Card)
- Changed property cardContract (object CardContract)
- Added property schemeReportDeclarationBehavior (string)
- Added property commercialProductReference (string)
- Added property commercialProductDescription (string)
- Changed property orders (array)
- Changed items (object Order)
- Changed property card (object Card)
- Changed property cardContract (object CardContract)
- Changed property card (object Card)
- Changed items (object Order)
- Changed property cardContract (object CardContract)
- Changed items (object Card)
- Changed items (object CardContract)
- Changed property cardContracts (array)
- Added property schemeReportDeclarationBehavior (string)
- Added property commercialProductReference (string)
- Added property commercialProductDescription (string)
GET /issuers/{issuerId}/card-contracts/{cardContractReference}/contract
Response:
- Changed property data (object Contract)
- Changed property cardContracts (array)
- Changed items (object CardContract)
- Added property schemeReportDeclarationBehavior (string)
- Added property commercialProductReference (string)
- Added property commercialProductDescription (string)
- Changed property cards (array)
- Changed items (object Card)
- Changed property cardContract (object CardContract)
- Added property schemeReportDeclarationBehavior (string)
- Added property commercialProductReference (string)
- Added property commercialProductDescription (string)
- Changed property orders (array)
- Changed items (object Order)
- Changed property card (object Card)
- Changed property cardContract (object CardContract)
- Changed property card (object Card)
- Changed items (object Order)
- Changed property cardContract (object CardContract)
- Changed items (object Card)
- Changed items (object CardContract)
- Changed property cardContracts (array)
- Added property schemeReportDeclarationBehavior (string)
- Added property commercialProductReference (string)
- Added property commercialProductDescription (string)
GET /issuers/{issuerId}/corporate-contracts/{contractReference}/corporate-employee-accounts/{accountReference}
Response:
- Changed property data (object CorporateEmployeeAccount)
- Changed property cardContracts (array)
- Changed items (object CardContract)
- Added property schemeReportDeclarationBehavior (string)
- Added property commercialProductReference (string)
- Added property commercialProductDescription (string)
- Changed property cards (array)
- Changed items (object Card)
- Changed property cardContract (object CardContract)
- Added property schemeReportDeclarationBehavior (string)
- Added property commercialProductReference (string)
- Added property commercialProductDescription (string)
- Changed property orders (array)
- Changed items (object Order)
- Changed property card (object Card)
- Changed property cardContract (object CardContract)
- Changed property card (object Card)
- Changed items (object Order)
- Changed property cardContract (object CardContract)
- Changed items (object Card)
- Changed items (object CardContract)
- Changed property cardContracts (array)
- Added property schemeReportDeclarationBehavior (string)
- Added property commercialProductReference (string)
- Added property commercialProductDescription (string)
GET /issuers/{issuerId}/corporate-contracts/{contractReference}/corporate-employee-accounts/external-accounts/{issuerAccountExternalReference}
Response:
- Changed property data (object CorporateEmployeeAccount)
- Changed property cardContracts (array)
- Changed items (object CardContract)
- Added property schemeReportDeclarationBehavior (string)
- Added property commercialProductReference (string)
- Added property commercialProductDescription (string)
- Changed property cards (array)
- Changed items (object Card)
- Changed property cardContract (object CardContract)
- Added property schemeReportDeclarationBehavior (string)
- Added property commercialProductReference (string)
- Added property commercialProductDescription (string)
- Changed property orders (array)
- Changed items (object Order)
- Changed property card (object Card)
- Changed property cardContract (object CardContract)
- Changed property card (object Card)
- Changed items (object Order)
- Changed property cardContract (object CardContract)
- Changed items (object Card)
- Changed items (object CardContract)
- Changed property cardContracts (array)
- Added property schemeReportDeclarationBehavior (string)
- Added property commercialProductReference (string)
- Added property commercialProductDescription (string)
GET /issuers/{issuerId}/corporate-contracts/external-contracts/{issuerContractExternalReference}/corporate-employee-accounts/external-accounts/{issuerAccountExternalReference}
Response:
- Changed property data (object CorporateEmployeeAccount)
- Changed property cardContracts (array)
- Changed items (object CardContract)
- Added property schemeReportDeclarationBehavior (string)
- Added property commercialProductReference (string)
- Added property commercialProductDescription (string)
- Changed property cards (array)
- Changed items (object Card)
- Changed property cardContract (object CardContract)
- Added property schemeReportDeclarationBehavior (string)
- Added property commercialProductReference (string)
- Added property commercialProductDescription (string)
- Changed property orders (array)
- Changed items (object Order)
- Changed property card (object Card)
- Changed property cardContract (object CardContract)
- Changed property card (object Card)
- Changed items (object Order)
- Changed property cardContract (object CardContract)
- Changed items (object Card)
- Changed items (object CardContract)
- Changed property cardContracts (array)
- Added property schemeReportDeclarationBehavior (string)
- Added property commercialProductReference (string)
- Added property commercialProductDescription (string)
GET /issuers/{issuerId}/corporate-contracts/external-contracts/{issuerContractExternalReference}/corporate-employee-accounts/{accountReference}
Response:
- Changed property data (object CorporateEmployeeAccount)
- Changed property cardContracts (array)
- Changed items (object CardContract)
- Added property schemeReportDeclarationBehavior (string)
- Added property commercialProductReference (string)
- Added property commercialProductDescription (string)
- Changed property cards (array)
- Changed items (object Card)
- Changed property cardContract (object CardContract)
- Added property schemeReportDeclarationBehavior (string)
- Added property commercialProductReference (string)
- Added property commercialProductDescription (string)
- Changed property orders (array)
- Changed items (object Order)
- Changed property card (object Card)
- Changed property cardContract (object CardContract)
- Changed property card (object Card)
- Changed items (object Order)
- Changed property cardContract (object CardContract)
- Changed items (object Card)
- Changed items (object CardContract)
- Changed property cardContracts (array)
- Added property schemeReportDeclarationBehavior (string)
- Added property commercialProductReference (string)
- Added property commercialProductDescription (string)
POST /issuers/{issuerId}/corporate-contracts/{contractReference}/add-corporate-employee-cards-accounts
Request body :
- Changed property addCorporateEmployeeCardsAndAccounts (object CreateCorporateContractRequest.AddCorporateEmployeeCardsAndAccounts)
- Changed property corporateEmployeeCards (array)
- Changed items (object CreateCorporateContractRequest.CorporateEmployeeCard)
- Changed property cardContract (object CreateCorporateContractRequest.CardContract)
- Added property schemeReportDeclarationBehavior (string)
- Changed property cardContract (object CreateCorporateContractRequest.CardContract)
- Changed items (object CreateCorporateContractRequest.CorporateEmployeeCard)
- Changed property corporateEmployeeCards (array)
POST /issuers/{issuerId}/corporate-contracts/external-contracts/{issuerContractExternalReference}/add-corporate-employee-cards-accounts
Request body :
- Changed property addCorporateEmployeeCardsAndAccounts (object CreateCorporateContractRequest.AddCorporateEmployeeCardsAndAccounts)
- Changed property corporateEmployeeCards (array)
- Changed items (object CreateCorporateContractRequest.CorporateEmployeeCard)
- Changed property cardContract (object CreateCorporateContractRequest.CardContract)
- Added property schemeReportDeclarationBehavior (string)
- Changed property cardContract (object CreateCorporateContractRequest.CardContract)
- Changed items (object CreateCorporateContractRequest.CorporateEmployeeCard)
- Changed property corporateEmployeeCards (array)
GET /issuers/{issuerId}/contracts/external-contracts/{issuerContractExternalReference}
Response:
- Changed property data (object Contract)
- Changed property cardContracts (array)
- Changed items (object CardContract)
- Added property schemeReportDeclarationBehavior (string)
- Added property commercialProductReference (string)
- Added property commercialProductDescription (string)
- Changed property cards (array)
- Changed items (object Card)
- Changed property cardContract (object CardContract)
- Added property schemeReportDeclarationBehavior (string)
- Added property commercialProductReference (string)
- Added property commercialProductDescription (string)
- Changed property orders (array)
- Changed items (object Order)
- Changed property card (object Card)
- Changed property cardContract (object CardContract)
- Changed property card (object Card)
- Changed items (object Order)
- Changed property cardContract (object CardContract)
- Changed items (object Card)
- Changed items (object CardContract)
- Changed property cardContracts (array)
- Added property schemeReportDeclarationBehavior (string)
- Added property commercialProductReference (string)
- Added property commercialProductDescription (string)
GET /issuers/{issuerId}/contracts/external-contracts/{issuerContractExternalReference}/card-contracts
Response:
- Changed property data (array)
- Changed items (object CardContract)
- Added property schemeReportDeclarationBehavior (string)
- Added property commercialProductReference (string)
- Added property commercialProductDescription (string)
- Changed property cards (array)
- Changed items (object Card)
- Changed property cardContract (object CardContract)
- Added property schemeReportDeclarationBehavior (string)
- Added property commercialProductReference (string)
- Added property commercialProductDescription (string)
- Changed property orders (array)
- Changed items (object Order)
- Changed property card (object Card)
- Changed property cardContract (object CardContract)
- Added property schemeReportDeclarationBehavior (string)
- Added property commercialProductReference (string)
- Added property commercialProductDescription (string)
- Changed property cardContract (object CardContract)
- Changed property card (object Card)
- Changed items (object Order)
- Changed property cardContract (object CardContract)
- Changed items (object Card)
- Changed items (object CardContract)
GET /issuers/{issuerId}/contracts/{contractReference}
Response:
- Changed property data (object Contract)
- Changed property cardContracts (array)
- Changed items (object CardContract)
- Added property schemeReportDeclarationBehavior (string)
- Added property commercialProductReference (string)
- Added property commercialProductDescription (string)
- Changed property cards (array)
- Changed items (object Card)
- Changed property cardContract (object CardContract)
- Added property schemeReportDeclarationBehavior (string)
- Added property commercialProductReference (string)
- Added property commercialProductDescription (string)
- Changed property orders (array)
- Changed items (object Order)
- Changed property card (object Card)
- Changed property cardContract (object CardContract)
- Changed property card (object Card)
- Changed items (object Order)
- Changed property cardContract (object CardContract)
- Changed items (object Card)
- Changed items (object CardContract)
- Changed property cardContracts (array)
- Added property schemeReportDeclarationBehavior (string)
- Added property commercialProductReference (string)
- Added property commercialProductDescription (string)
GET /issuers/{issuerId}/contracts/{contractReference}/card-contracts
Response:
- Changed property data (array)
- Changed items (object CardContract)
- Added property schemeReportDeclarationBehavior (string)
- Added property commercialProductReference (string)
- Added property commercialProductDescription (string)
- Changed property cards (array)
- Changed items (object Card)
- Changed property cardContract (object CardContract)
- Added property schemeReportDeclarationBehavior (string)
- Added property commercialProductReference (string)
- Added property commercialProductDescription (string)
- Changed property orders (array)
- Changed items (object Order)
- Changed property card (object Card)
- Changed property cardContract (object CardContract)
- Added property schemeReportDeclarationBehavior (string)
- Added property commercialProductReference (string)
- Added property commercialProductDescription (string)
- Changed property cardContract (object CardContract)
- Changed property card (object Card)
- Changed items (object Order)
- Changed property cardContract (object CardContract)
- Changed items (object Card)
- Changed items (object CardContract)
GET /issuers/{issuerId}/customers/external-customers/{issuerCustomerExternalReference}/card-contracts
Response:
- Changed property data (array)
- Changed items (object CardContract)
- Added property schemeReportDeclarationBehavior (string)
- Added property commercialProductReference (string)
- Added property commercialProductDescription (string)
- Changed property cards (array)
- Changed items (object Card)
- Changed property cardContract (object CardContract)
- Added property schemeReportDeclarationBehavior (string)
- Added property commercialProductReference (string)
- Added property commercialProductDescription (string)
- Changed property orders (array)
- Changed items (object Order)
- Changed property card (object Card)
- Changed property cardContract (object CardContract)
- Added property schemeReportDeclarationBehavior (string)
- Added property commercialProductReference (string)
- Added property commercialProductDescription (string)
- Changed property cardContract (object CardContract)
- Changed property card (object Card)
- Changed items (object Order)
- Changed property cardContract (object CardContract)
- Changed items (object Card)
- Changed items (object CardContract)
GET /issuers/{issuerId}/customers/{customerReference}/card-contracts
Response:
- Changed property data (array)
- Changed items (object CardContract)
- Added property schemeReportDeclarationBehavior (string)
- Added property commercialProductReference (string)
- Added property commercialProductDescription (string)
- Changed property cards (array)
- Changed items (object Card)
- Changed property cardContract (object CardContract)
- Added property schemeReportDeclarationBehavior (string)
- Added property commercialProductReference (string)
- Added property commercialProductDescription (string)
- Changed property orders (array)
- Changed items (object Order)
- Changed property card (object Card)
- Changed property cardContract (object CardContract)
- Added property schemeReportDeclarationBehavior (string)
- Added property commercialProductReference (string)
- Added property commercialProductDescription (string)
- Changed property cardContract (object CardContract)
- Changed property card (object Card)
- Changed items (object Order)
- Changed property cardContract (object CardContract)
- Changed items (object Card)
- Changed items (object CardContract)
GET /issuers/{issuerId}/accounts/external-accounts/{issuerAccountExternalReference}/corporate-contract
Response:
- Changed property data (object CorporateContract)
- Added property numberOfFreeCardsMembershipFee (integer)
- Added property numberOfFreeCardsAccountSetupFee (integer)
- Changed property corporateEmployeeAccounts (array)
- Changed items (object CorporateEmployeeAccount)
- Changed property cardContracts (array)
- Changed items (object CardContract)
- Added property schemeReportDeclarationBehavior (string)
- Added property commercialProductReference (string)
- Added property commercialProductDescription (string)
- Changed property cards (array)
- Changed items (object Card)
- Changed property cardContract (object CardContract)
- Added property schemeReportDeclarationBehavior (string)
- Added property commercialProductReference (string)
- Added property commercialProductDescription (string)
- Changed property orders (array)
- Changed items (object Order)
- Changed property cardContract (object CardContract)
- Changed items (object Card)
- Changed items (object CardContract)
- Changed property cardContracts (array)
- Changed items (object CorporateEmployeeAccount)
- Changed property card (object Card)
- Changed property cardContract (object CardContract)
- Added property schemeReportDeclarationBehavior (string)
- Added property commercialProductReference (string)
- Added property commercialProductDescription (string)
- Changed property cardContract (object CardContract)
GET /issuers/{issuerId}/accounts/{accountReference}/corporate-contract
Response:
- Changed property data (object CorporateContract)
- Added property numberOfFreeCardsMembershipFee (integer)
- Added property numberOfFreeCardsAccountSetupFee (integer)
- Changed property corporateEmployeeAccounts (array)
- Changed items (object CorporateEmployeeAccount)
- Changed property cardContracts (array)
- Changed items (object CardContract)
- Added property schemeReportDeclarationBehavior (string)
- Added property commercialProductReference (string)
- Added property commercialProductDescription (string)
- Changed property cards (array)
- Changed items (object Card)
- Changed property cardContract (object CardContract)
- Added property schemeReportDeclarationBehavior (string)
- Added property commercialProductReference (string)
- Added property commercialProductDescription (string)
- Changed property orders (array)
- Changed items (object Order)
- Changed property cardContract (object CardContract)
- Changed items (object Card)
- Changed items (object CardContract)
- Changed property cardContracts (array)
- Changed items (object CorporateEmployeeAccount)
- Changed property card (object Card)
- Changed property cardContract (object CardContract)
- Added property schemeReportDeclarationBehavior (string)
- Added property commercialProductReference (string)
- Added property commercialProductDescription (string)
- Changed property cardContract (object CardContract)
GET /issuers/{issuerId}/card-contracts/external-card-contracts/{issuerCardContractExternalReference}/corporate-contract
Response:
- Changed property data (object CorporateContract)
- Added property numberOfFreeCardsMembershipFee (integer)
- Added property numberOfFreeCardsAccountSetupFee (integer)
- Changed property corporateEmployeeAccounts (array)
- Changed items (object CorporateEmployeeAccount)
- Changed property cardContracts (array)
- Changed items (object CardContract)
- Added property schemeReportDeclarationBehavior (string)
- Added property commercialProductReference (string)
- Added property commercialProductDescription (string)
- Changed property cards (array)
- Changed items (object Card)
- Changed property cardContract (object CardContract)
- Added property schemeReportDeclarationBehavior (string)
- Added property commercialProductReference (string)
- Added property commercialProductDescription (string)
- Changed property orders (array)
- Changed items (object Order)
- Changed property cardContract (object CardContract)
- Changed items (object Card)
- Changed items (object CardContract)
- Changed property cardContracts (array)
- Changed items (object CorporateEmployeeAccount)
- Changed property card (object Card)
- Changed property cardContract (object CardContract)
- Added property schemeReportDeclarationBehavior (string)
- Added property commercialProductReference (string)
- Added property commercialProductDescription (string)
- Changed property cardContract (object CardContract)
GET /issuers/{issuerId}/card-contracts/{cardContractReference}/corporate-contract
Response:
- Changed property data (object CorporateContract)
- Added property numberOfFreeCardsMembershipFee (integer)
- Added property numberOfFreeCardsAccountSetupFee (integer)
- Changed property corporateEmployeeAccounts (array)
- Changed items (object CorporateEmployeeAccount)
- Changed property cardContracts (array)
- Changed items (object CardContract)
- Added property schemeReportDeclarationBehavior (string)
- Added property commercialProductReference (string)
- Added property commercialProductDescription (string)
- Changed property cards (array)
- Changed items (object Card)
- Changed property cardContract (object CardContract)
- Added property schemeReportDeclarationBehavior (string)
- Added property commercialProductReference (string)
- Added property commercialProductDescription (string)
- Changed property orders (array)
- Changed items (object Order)
- Changed property cardContract (object CardContract)
- Changed items (object Card)
- Changed items (object CardContract)
- Changed property cardContracts (array)
- Changed items (object CorporateEmployeeAccount)
- Changed property card (object Card)
- Changed property cardContract (object CardContract)
- Added property schemeReportDeclarationBehavior (string)
- Added property commercialProductReference (string)
- Added property commercialProductDescription (string)
- Changed property cardContract (object CardContract)
PATCH /issuers/{issuerId}/corporate-contracts/{contractReference}
Request body :
- Added property numberOfFreeCardsAccountSetupFee (integer)
- Added property numberOfFreeCardsMembershipFee (integer)
GET /issuers/{issuerId}/corporate-contracts/{contractReference}
Response:
- Changed property data (object CorporateContract)
- Added property numberOfFreeCardsMembershipFee (integer)
- Added property numberOfFreeCardsAccountSetupFee (integer)
- Changed property corporateEmployeeAccounts (array)
- Changed items (object CorporateEmployeeAccount)
- Changed property cardContracts (array)
- Changed items (object CardContract)
- Added property schemeReportDeclarationBehavior (string)
- Added property commercialProductReference (string)
- Added property commercialProductDescription (string)
- Changed property cards (array)
- Changed items (object Card)
- Changed property cardContract (object CardContract)
- Added property schemeReportDeclarationBehavior (string)
- Added property commercialProductReference (string)
- Added property commercialProductDescription (string)
- Changed property orders (array)
- Changed items (object Order)
- Changed property cardContract (object CardContract)
- Changed items (object Card)
- Changed items (object CardContract)
- Changed property cardContracts (array)
- Changed items (object CorporateEmployeeAccount)
- Changed property card (object Card)
- Changed property cardContract (object CardContract)
- Added property schemeReportDeclarationBehavior (string)
- Added property commercialProductReference (string)
- Added property commercialProductDescription (string)
- Changed property cardContract (object CardContract)
PATCH /issuers/{issuerId}/corporate-contracts/external-contracts/{issuerContractExternalReference}
Request body :
- Added property numberOfFreeCardsAccountSetupFee (integer)
- Added property numberOfFreeCardsMembershipFee (integer)
GET /issuers/{issuerId}/corporate-contracts/external-contracts/{issuerContractExternalReference}
Response:
- Changed property data (object CorporateContract)
- Added property numberOfFreeCardsMembershipFee (integer)
- Added property numberOfFreeCardsAccountSetupFee (integer)
- Changed property corporateEmployeeAccounts (array)
- Changed items (object CorporateEmployeeAccount)
- Changed property cardContracts (array)
- Changed items (object CardContract)
- Added property schemeReportDeclarationBehavior (string)
- Added property commercialProductReference (string)
- Added property commercialProductDescription (string)
- Changed property cards (array)
- Changed items (object Card)
- Changed property cardContract (object CardContract)
- Added property schemeReportDeclarationBehavior (string)
- Added property commercialProductReference (string)
- Added property commercialProductDescription (string)
- Changed property orders (array)
- Changed items (object Order)
- Changed property cardContract (object CardContract)
- Changed items (object Card)
- Changed items (object CardContract)
- Changed property cardContracts (array)
- Changed items (object CorporateEmployeeAccount)
- Changed property card (object Card)
- Changed property cardContract (object CardContract)
- Added property schemeReportDeclarationBehavior (string)
- Added property commercialProductReference (string)
- Added property commercialProductDescription (string)
- Changed property cardContract (object CardContract)
POST /issuers/{issuerId}/corporate-contracts/create-corporate-contract
Request body :
- Changed property corporateContract (object CreateCorporateContractRequest.Contract)
- Added property numberOfFreeCardsAccountSetupFee (integer)
- Added property numberOfFreeCardsMembershipFee (integer)
- Changed property addCorporateEmployeeCardsAndAccounts (array)
- Changed items (object CreateCorporateContractRequest.AddCorporateEmployeeCardsAndAccounts)
- Changed property corporateEmployeeCards (array)
- Changed items (object CreateCorporateContractRequest.CorporateEmployeeCard)
- Changed property cardContract (object CreateCorporateContractRequest.CardContract)
- Added property schemeReportDeclarationBehavior (string)
- Changed property cardContract (object CreateCorporateContractRequest.CardContract)
- Changed items (object CreateCorporateContractRequest.CorporateEmployeeCard)
- Changed property corporateEmployeeCards (array)
- Changed items (object CreateCorporateContractRequest.AddCorporateEmployeeCardsAndAccounts)
POST /search-contracts
Response:
- Changed property data (array)
- Changed items (object Contract)
- Changed property cardContracts (array)
- Changed items (object CardContract)
- Added property schemeReportDeclarationBehavior (string)
- Added property commercialProductReference (string)
- Added property commercialProductDescription (string)
- Changed property cards (array)
- Changed items (object Card)
- Changed property cardContract (object CardContract)
- Added property schemeReportDeclarationBehavior (string)
- Added property commercialProductReference (string)
- Added property commercialProductDescription (string)
- Changed property orders (array)
- Changed items (object Order)
- Changed property card (object Card)
- Changed items (object Order)
- Changed property cardContract (object CardContract)
- Changed items (object Card)
- Changed items (object CardContract)
- Changed property cardContracts (array)
- Changed items (object Contract)
- Changed property cardContract (object CardContract)
- Added property schemeReportDeclarationBehavior (string)
- Added property commercialProductReference (string)
- Added property commercialProductDescription (string)
POST /issuers/{issuerId}/contracts/search
Response:
- Changed property data (array)
- Changed items (object Contract)
- Changed property cardContracts (array)
- Changed items (object CardContract)
- Added property schemeReportDeclarationBehavior (string)
- Added property commercialProductReference (string)
- Added property commercialProductDescription (string)
- Changed property cards (array)
- Changed items (object Card)
- Changed property cardContract (object CardContract)
- Added property schemeReportDeclarationBehavior (string)
- Added property commercialProductReference (string)
- Added property commercialProductDescription (string)
- Changed property orders (array)
- Changed items (object Order)
- Changed property card (object Card)
- Changed items (object Order)
- Changed property cardContract (object CardContract)
- Changed items (object Card)
- Changed items (object CardContract)
- Changed property cardContracts (array)
- Changed items (object Contract)
- Changed property cardContract (object CardContract)
- Added property schemeReportDeclarationBehavior (string)
- Added property commercialProductReference (string)
- Added property commercialProductDescription (string)
GET /issuers/{issuerId}/customers/external-customers/{issuerCustomerExternalReference}/contracts
Response:
- Changed property data (array)
- Changed items (object Contract)
- Changed property cardContracts (array)
- Changed items (object CardContract)
- Added property schemeReportDeclarationBehavior (string)
- Added property commercialProductReference (string)
- Added property commercialProductDescription (string)
- Changed property cards (array)
- Changed items (object Card)
- Changed property cardContract (object CardContract)
- Added property schemeReportDeclarationBehavior (string)
- Added property commercialProductReference (string)
- Added property commercialProductDescription (string)
- Changed property orders (array)
- Changed items (object Order)
- Changed property card (object Card)
- Changed items (object Order)
- Changed property cardContract (object CardContract)
- Changed items (object Card)
- Changed items (object CardContract)
- Changed property cardContracts (array)
- Changed items (object Contract)
- Changed property cardContract (object CardContract)
- Added property schemeReportDeclarationBehavior (string)
- Added property commercialProductReference (string)
- Added property commercialProductDescription (string)
GET /issuers/{issuerId}/customers/{customerReference}/contracts
Response:
- Changed property data (array)
- Changed items (object Contract)
- Changed property cardContracts (array)
- Changed items (object CardContract)
- Added property schemeReportDeclarationBehavior (string)
- Added property commercialProductReference (string)
- Added property commercialProductDescription (string)
- Changed property cards (array)
- Changed items (object Card)
- Changed property cardContract (object CardContract)
- Added property schemeReportDeclarationBehavior (string)
- Added property commercialProductReference (string)
- Added property commercialProductDescription (string)
- Changed property orders (array)
- Changed items (object Order)
- Changed property card (object Card)
- Changed items (object Order)
- Changed property cardContract (object CardContract)
- Changed items (object Card)
- Changed items (object CardContract)
- Changed property cardContracts (array)
- Changed items (object Contract)
- Changed property cardContract (object CardContract)
- Added property schemeReportDeclarationBehavior (string)
- Added property commercialProductReference (string)
- Added property commercialProductDescription (string)
GET /issuers/{issuerId}/companies/{customerReference}/corporate-contracts
Response:
- Changed property data (array)
- Changed items (object CorporateContract)
- Added property numberOfFreeCardsMembershipFee (integer)
- Added property numberOfFreeCardsAccountSetupFee (integer)
- Changed property corporateEmployeeAccounts (array)
- Changed items (object CorporateEmployeeAccount)
- Changed property cardContracts (array)
- Changed items (object CardContract)
- Added property schemeReportDeclarationBehavior (string)
- Added property commercialProductReference (string)
- Added property commercialProductDescription (string)
- Changed property cards (array)
- Changed items (object Card)
- Changed property cardContract (object CardContract)
- Changed items (object Card)
- Changed items (object CardContract)
- Changed property cardContracts (array)
- Changed items (object CorporateEmployeeAccount)
- Changed items (object CorporateContract)
- Added property schemeReportDeclarationBehavior (string)
- Added property commercialProductReference (string)
- Added property commercialProductDescription (string)
- Changed property orders (array)
- Changed items (object Order)
- Changed property card (object Card)
- Changed property cardContract (object CardContract)
- Added property schemeReportDeclarationBehavior (string)
- Added property commercialProductReference (string)
- Added property commercialProductDescription (string)
- Changed property cardContract (object CardContract)
- Changed property card (object Card)
GET /issuers/{issuerId}/companies/external-customers/{issuerCustomerExternalReference}/corporate-contracts
Response:
- Changed property data (array)
- Changed items (object CorporateContract)
- Added property numberOfFreeCardsMembershipFee (integer)
- Added property numberOfFreeCardsAccountSetupFee (integer)
- Changed property corporateEmployeeAccounts (array)
- Changed items (object CorporateEmployeeAccount)
- Changed property cardContracts (array)
- Changed items (object CardContract)
- Added property schemeReportDeclarationBehavior (string)
- Added property commercialProductReference (string)
- Added property commercialProductDescription (string)
- Changed property cards (array)
- Changed items (object Card)
- Changed property cardContract (object CardContract)
- Changed items (object Card)
- Changed items (object CardContract)
- Changed property cardContracts (array)
- Changed items (object CorporateEmployeeAccount)
- Changed items (object CorporateContract)
- Added property schemeReportDeclarationBehavior (string)
- Added property commercialProductReference (string)
- Added property commercialProductDescription (string)
- Changed property orders (array)
- Changed items (object Order)
- Changed property card (object Card)
- Changed property cardContract (object CardContract)
- Added property schemeReportDeclarationBehavior (string)
- Added property commercialProductReference (string)
- Added property commercialProductDescription (string)
- Changed property cardContract (object CardContract)
- Changed property card (object Card)
POST /search-corporate-contracts
Response:
- Changed property data (array)
- Changed items (object CorporateContract)
- Added property numberOfFreeCardsMembershipFee (integer)
- Added property numberOfFreeCardsAccountSetupFee (integer)
- Changed property corporateEmployeeAccounts (array)
- Changed items (object CorporateEmployeeAccount)
- Changed property cardContracts (array)
- Changed items (object CardContract)
- Added property schemeReportDeclarationBehavior (string)
- Added property commercialProductReference (string)
- Added property commercialProductDescription (string)
- Changed property cards (array)
- Changed items (object Card)
- Changed property cardContract (object CardContract)
- Changed items (object Card)
- Changed items (object CardContract)
- Changed property cardContracts (array)
- Changed items (object CorporateEmployeeAccount)
- Changed items (object CorporateContract)
- Added property schemeReportDeclarationBehavior (string)
- Added property commercialProductReference (string)
- Added property commercialProductDescription (string)
- Changed property orders (array)
- Changed items (object Order)
- Changed property card (object Card)
- Changed property cardContract (object CardContract)
- Added property schemeReportDeclarationBehavior (string)
- Added property commercialProductReference (string)
- Added property commercialProductDescription (string)
- Changed property cardContract (object CardContract)
- Changed property card (object Card)
PATCH /issuers/{issuerId}/accounts/external-accounts/{issuerAccountExternalReference}
Request body :
- Added property creditBureauContractFlag (boolean)
GET /issuers/{issuerId}/accounts/external-accounts/{issuerAccountExternalReference}/statements/{cycleClosureDate}/operations
Parameters:
Added: excludeOperationKinds in query
PATCH /issuers/{issuerId}/accounts/{accountReference}
Request body :
- Added property creditBureauContractFlag (boolean)
GET /issuers/{issuerId}/accounts/{accountReference}/statements/{cycleClosureDate}/operations
Parameters:
Added: excludeOperationKinds in query
POST /issuers/{issuerId}/corporate-contracts/{contractReference}/add-corporate-contract-entity
Request body :
- Changed property addCorporateContractEntity (object CreateCorporateContractRequest.AddCorporateContractEntity)
- Changed property corporateContractEntityAccounts (array)
- Changed items (object CreateCorporateContractRequest.CorporateContractEntityAccount)
- Changed property account (object CreateCorporateContractRequest.Account)
- Added property creditBureauContractFlag (boolean)
- Changed property account (object CreateCorporateContractRequest.Account)
- Changed items (object CreateCorporateContractRequest.CorporateContractEntityAccount)
- Changed property corporateContractEntityAccounts (array)
POST /issuers/{issuerId}/corporate-contracts/external-contracts/{issuerContractExternalReference}/add-corporate-contract-entity
Request body :
- Changed property addCorporateContractEntity (object CreateCorporateContractRequest.AddCorporateContractEntity)
- Changed property corporateContractEntityAccounts (array)
- Changed items (object CreateCorporateContractRequest.CorporateContractEntityAccount)
- Changed property account (object CreateCorporateContractRequest.Account)
- Added property creditBureauContractFlag (boolean)
- Changed property account (object CreateCorporateContractRequest.Account)
- Changed items (object CreateCorporateContractRequest.CorporateContractEntityAccount)
- Changed property corporateContractEntityAccounts (array)
POST /issuers/{issuerId}/corporate-contracts/{contractReference}/add-virtual-cards-accounts-service
Request body :
- Changed property addCorporateVcaServiceCardsAndAccounts (object CreateCorporateContractRequest.AddCorporateVcaServiceCardsAndAccounts)
- Changed property corporateEmployeeAccounts (array)
- Changed items (object CreateCorporateContractRequest.CorporateEmployeeAccount)
- Changed property account (object CreateCorporateContractRequest.Account)
- Added property creditBureauContractFlag (boolean)
- Changed property account (object CreateCorporateContractRequest.Account)
- Changed items (object CreateCorporateContractRequest.CorporateEmployeeAccount)
- Changed property corporateEmployeeAccounts (array)
POST /issuers/{issuerId}/corporate-contracts/external-contracts/{issuerContractExternalReference}/add-virtual-cards-accounts-service
Request body :
- Changed property addCorporateVcaServiceCardsAndAccounts (object CreateCorporateContractRequest.AddCorporateVcaServiceCardsAndAccounts)
- Changed property corporateEmployeeAccounts (array)
- Changed items (object CreateCorporateContractRequest.CorporateEmployeeAccount)
- Changed property account (object CreateCorporateContractRequest.Account)
- Added property creditBureauContractFlag (boolean)
- Changed property account (object CreateCorporateContractRequest.Account)
- Changed items (object CreateCorporateContractRequest.CorporateEmployeeAccount)
- Changed property corporateEmployeeAccounts (array)
POST /issuers/{issuerId}/contracts/create-consumer-contract
Request body :
- Changed property addCardsAccounts (object CreateConsumerContractRequest.AddCardsAccounts)
- Changed property accounts (array)
- Changed items (object CreateConsumerContractRequest.Account)
- Added property creditBureauContractFlag (boolean)
- Changed items (object CreateConsumerContractRequest.Account)
- Changed property accounts (array)
POST /issuers/{issuerId}/contracts/external-contracts/{issuerContractExternalReference}/add-cards-accounts
Request body :
- Changed property accountHierarchy (object AddCardsAccountsRequest.AccountHierarchy)
- Changed property accounts (array)
- Changed items (object CreateConsumerContractRequest.Account)
- Added property creditBureauContractFlag (boolean)
- Changed items (object CreateConsumerContractRequest.Account)
- Changed property accounts (array)
POST /issuers/{issuerId}/contracts/{contractReference}/add-cards-accounts
Request body :
- Changed property accountHierarchy (object AddCardsAccountsRequest.AccountHierarchy)
- Changed property accounts (array)
- Changed items (object CreateConsumerContractRequest.Account)
- Added property creditBureauContractFlag (boolean)
- Changed items (object CreateConsumerContractRequest.Account)
- Changed property accounts (array)
POST /issuers/{issuerId}/corporate-contracts/{contractReference}/add-corporate-employee-cards-accounts
Request body :
- Changed property addCorporateEmployeeCardsAndAccounts (object CreateCorporateContractRequest.AddCorporateEmployeeCardsAndAccounts)
- Changed property corporateEmployeeAccounts (array)
- Changed items (object CreateCorporateContractRequest.CorporateEmployeeAccount)
- Changed property account (object CreateCorporateContractRequest.Account)
- Added property creditBureauContractFlag (boolean)
- Changed property account (object CreateCorporateContractRequest.Account)
- Changed items (object CreateCorporateContractRequest.CorporateEmployeeAccount)
- Changed property corporateEmployeeAccounts (array)
POST /issuers/{issuerId}/corporate-contracts/external-contracts/{issuerContractExternalReference}/add-corporate-employee-cards-accounts
Request body :
- Changed property addCorporateEmployeeCardsAndAccounts (object CreateCorporateContractRequest.AddCorporateEmployeeCardsAndAccounts)
- Changed property corporateEmployeeAccounts (array)
- Changed items (object CreateCorporateContractRequest.CorporateEmployeeAccount)
- Changed property account (object CreateCorporateContractRequest.Account)
- Added property creditBureauContractFlag (boolean)
- Changed property account (object CreateCorporateContractRequest.Account)
- Changed items (object CreateCorporateContractRequest.CorporateEmployeeAccount)
- Changed property corporateEmployeeAccounts (array)
POST /issuers/{issuerId}/corporate-contracts/create-corporate-contract
Request body :
- Changed property addCorporateContractEntities (array)
- Changed items (object CreateCorporateContractRequest.AddCorporateContractEntity)
- Changed property corporateContractEntityAccounts (array)
- Changed items (object CreateCorporateContractRequest.CorporateContractEntityAccount)
- Changed property account (object CreateCorporateContractRequest.Account)
- Added property creditBureauContractFlag (boolean)
- Changed property account (object CreateCorporateContractRequest.Account)
- Changed items (object CreateCorporateContractRequest.CorporateContractEntityAccount)
- Changed property corporateContractEntityAccounts (array)
- Changed items (object CreateCorporateContractRequest.AddCorporateContractEntity)
- Changed property corporateContract (object CreateCorporateContractRequest.Contract)
- Changed property corporateContractRootEntity (object CreateCorporateContractRequest.CorporateContractRootEntity)
- Changed property rootAccount (object CreateCorporateContractRequest.Account)
- Added property creditBureauContractFlag (boolean)
- Changed property rootAccount (object CreateCorporateContractRequest.Account)
- Changed property corporateContractRootEntity (object CreateCorporateContractRequest.CorporateContractRootEntity)
- Changed property addCorporateEmployeeCardsAndAccounts (array)
- Changed items (object CreateCorporateContractRequest.AddCorporateEmployeeCardsAndAccounts)
- Changed property corporateEmployeeAccounts (array)
- Changed items (object CreateCorporateContractRequest.CorporateEmployeeAccount)
- Changed property account (object CreateCorporateContractRequest.Account)
- Added property creditBureauContractFlag (boolean)
- Changed property account (object CreateCorporateContractRequest.Account)
- Changed items (object CreateCorporateContractRequest.CorporateEmployeeAccount)
- Changed property corporateEmployeeAccounts (array)
- Changed items (object CreateCorporateContractRequest.AddCorporateEmployeeCardsAndAccounts)
.
API technical configuration
API technical configuration
1. Overview
WL ACS platform exposes unified APIs for host-to-host communications.
The methods are exposed through a RESTful API built on HTTP and JSON.
The data exchanged is serialized using JSON format (RFC 7159).
The character set supported for input and output data is UTF-8 (RFC 3629).
As per the REST principles:
- All the methods are accessed by performing an HTTP request to the web service endpoint,
- URL are used to access the data
- HTTP bodies carry the representation of the business objects (elements),
- HTTP verbs are used to indicate the action to perform :
- POST: create a new element for which no identifier is known
- PUT: update an element, or create a resource for which the identifier is known in advance
- GET: retrieve one or more elements
- DELETE: delete an element
HTTP headers are used to carry information related to the API protocol: authentication, pagination, API versioning…
All the services are exposed through the HTTPS protocol (RFC 2818) TLS 1. 2.
No HTTP compression (RFC 2616) is activated.
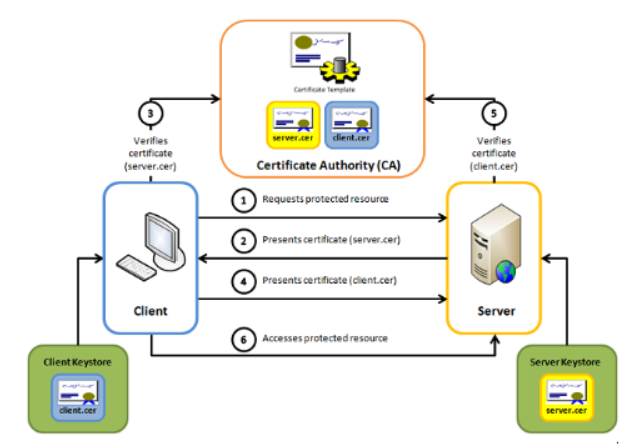
In order to secure the communication channel between the bank and WL ACS platform, a mutual authentication mTLS is required.
In addition, an Ouath 2.0 security channel could be implemented for Client APIs.
2. API Server
2.1. Security
In order to secure the communication channel between the bank and WL ACS platform, a mutual authentication mTLS is required.
Clients must provide a mutual authentication (client) certificate that complies with the following rules.
2.1.1. Testing environment
The certificate file must comply with the PKCS10 format and be base-64 encoded.
Important note: the use of ‘&’ and ‘<’ characters in the certificate fields is prohibited.
Field | Description |
Validity | 2 or 3 years |
Key length | 2048 |
Key type | RSA SHA-256 |
Common Name (CN) | Your API-Key must be provided here. |
Organizational Unit (OU) | Free content |
Organizational Name (O) | Free content |
Country (C) | Country of the requestor (ISO 3166 2 format) |
State (ST) | State (should not be abbreviated) |
Locality (L) | Locality |
Email address | An email address to contact the organization. Usually the email address of the certificate administrator or IT department |
2.1.2 Production
Important note: the use of ‘&’ and ‘<’ characters in the certificate fields is prohibited.
Field | Description |
Validity | 2 or 3 years |
Key length | 2048 |
Key type | RSA SHA-256 |
Common Name (CN) | Your API-Key must be provided here. |
Organizational Unit (OU) | Free content |
Organizational Name (O) | Free content |
Country (C) | Country of the requestor (ISO 3166 2 format) |
State (ST) | State (should not be abbreviated) |
Locality (L) | Locality |
Email address | An email address to contact the organization. Usually the email address of the certificate administrator or IT department |
2.2 Versioning
For WL Server APIs, the version number has been included in the service URI.
By default, when the version is not provided in the URI, the initial version 2019R1.0 implementation is used.
Version URI parameter | Version used |
none | 2019R1.0 |
2019R1-1.0 | 2019R1.0 |
2019R2-1.0 | 2019R2.0 |
2021R1-1.0 | 2021R1.0 |
2021R2-1.0 | 2021R2.0 |
2021R3-1.0 | 2021R3.0 |
2022R1-1.0 | 2022R1.0 |
2023R1-1.0 | 2023R1.0 |
2023R2-1.0 | 2023R2.0 |
2023R3-1.0 | 2023R3.0 |
Examples of URI :
/referential/rest/2019R2-1.0/public/updateCardWithCredentials/669c8c64-e71f-4e87-8966-cb578a86074e
/referential/rest/2021R1-1.0/public/updateCardWithCredentials/3aaa4686-d139-4822-b193-6a0140467264
2.3 Message format
2.3.1. Common headers request
Accept | |
Description | Header to ensure acceptance of a JSON UTF-8 response compatible with target version of the API |
Mandatory | Yes |
Format | ^application/json; *charset=UTF-8$ |
Example | application/json; charset=UTF-8 |
Content-Type | |
Description | Header that denotes the API version, content type and charset of the response. |
Mandatory | Yes |
Format | ^application/json; *charset=UTF-8$ |
Example | application/json; charset=UTF-8 |
2.3.2. Common headers response
Date | |
Description | Date contains the date and time at which the message was generated |
Mandatory | Yes |
Format | day-name, day month year hour:minute:second GMT |
Example | Fri, 17 Sep 2021 09:34:19 GMT |
Content-Type | |
Description | Header that denotes content type of the response. |
Mandatory | Yes |
Format | application/json |
Example | application/json |
Content-Length | |
Description | Content-Length indicate the size of entity-body in decimal no of octets. |
Mandatory | Yes |
Format | decimal |
Example | 393 |
3. API Client
3.1. Security
In order to secure the communication channel between the bank and WL ACS platform, a mutual authentication mTLS is recommended.
In replacement or addition to mTLS, an Oauth 2.0 authentication could be used (cf. paragraph 5)
For mTLS,
Client certificate :
WL will provide a Certificate Request based on Bank recommendation.
Bank must sign the certificate with AC of its choice.
The certificate file must comply with the PKCS10 format and be base-64 encoded.
Server certificate:
Bank must provide SSL certificates (root/ac) used to sign the URL name of the API.
3.2 Versioning
Client APIs can be modified during major product releases.
However, to avoid server-side impacts, changes are limited to the addition of optional supplementary fields.
Additionally, APIs are versioned and configurable by the bank, so upgrading to a new version is not mandatory. The new fields will only be transmitted starting from the version in which they are implemented (see the "since release" label in the Swagger file).
A bank wishing to have the latest version of the API must thus request it from their WL contact; by default, no API changes will be made without an explicit request.
3.3 Message Format
3.2.1. Hypermedia
Hypermedia is used to specify content type and charset to be used.
Currently supported values are:
- Content type: json
- Charset: UTF-8
Accept | |
Description | Header to ensure acceptance of a JSON UTF-8 response compatible with target version of the API |
Mandatory | Yes |
Format | application/json |
Example | application/json |
Table 1 - Hypermedia input header
Content-Type | |
Description | Header that denotes the API version, content type and charset of the response. |
Mandatory | Yes |
Format | application/json |
Example | application/json |
Table 2 - Hypermedia output header
3.4. Signature
Signature is currently only available for Authentication and Credential API.
3.4.1. Signature content
The signature fields are optional and are only filled and/or checked if explicitly required.Otherwise, signature values will be ignored in responses and left empty in requests. Signatures can be activated for each issuer, sub-issuer individually and at a method level.
To pass validation, the signature format must be RFC 7515 (JSON Web Signature) and RFC 7797 (Unencoded or detached payload) compliant. As such a typical signature should look like this [header]..[signature] where:
- [header] : a Base64 URL encoding of the JOSE header which contains the key ID, algorithm and object type. For example: eyJraWQiOiJzaWduIiwidHlwIjoiSk9TRStKU09OIiwiYWxnIjoiUlMyNTYifQ which in clear JSON gives: {"kid":"sign","typ":"JOSE+JSON","alg":"RS256"}. The "kid" (Key ID) and "alg" header fields are both required to perform the check. An additional "jku" parameter in which a JWKS URL where to retrieve the public key can also be specified, if not it should be expected for public keys to have been exchanged beforehand. The "typ" is only there by convention and should only be set as JOSE or JOSE+JSON since were are not dealing JWT (tokens) here.
- [signature] : a Base64 URL encoded value representation of the signature output. The payload used to generate the signature consists of the JSON serialization of the whole object, excluding old signatures and null values, which is then Base 64 URL encoded as well.
If the signature from the response contains a payload value then it will be ignored in favor to the actual object.
3.4.2. Supported algorithm
Currently supported algorithms are RS256, RS384, RS512, ES256, ES256K, ES384, and ES512.
3.4.3. Samples
{
"header": {
"issuerCode": "123456",
"subIssuerCode": "987654",
"service": "ACS_TEST",
"requestId": "5850e990-a21e-4925-8483-a407ef609e30",
"keyTag": "01"
},
"body": "Hello",
"signature": "eyJraWQiOiJzaWduIiwidHlwIjoiSk9TRStKU09OIiwiYWxnIjoiUlMyNTYifQ..QslvRsAf7favTzmZACC6l1UbjySjezKwCIJ0T-qxWkla0GjACsp-5TzannnBoTYzpZfa9BasNVRe1UZyTKEF8ViQX_LL_XnMoDttzB15zCoKkLhgcTOqSmrUa2p_hPOTnmL40TAnlykqNA0MlOQ9nox3K7a-rlfAG4FVXypyaHN71rCBfMQiw5eY-57e3DEdcjDAIWMxKh2zaM4HZ43K2fc1DQHGB-k9aTljOZAEhe6D7dgTYV0EGAHzRw51x15xnPD7_z-sJGpun9iVZpf8fHu9dTn5lhMChQvEBqElxWpm6fET7Izm8hqMa1oUkf2l5ue9h-WotzIbzE4PQuLOxw"
}3. Data Encryption
Some fields, corresponding to sensitive data, can be either encrypted or plain. In this case, there is a type, a value and a key tag attribute.
When the type is encrypted, the value attribute is a String, before encryption and after being decrypted. The encrypted result is in Hexadecimal format compliant with JSON structure.
That’s why this field doesn’t need to be parsed into JSON object.
Only for plain formats, the value needs to be casted to as JSON object. As a result, all the double quotes characters need to be escaped by a backslash, resulting to the following format: "\"PWD\": {\"pwd\":\"@value\"}".
When sensitive fields are encrypted, a “keyTag” value is requested to identify the key used. The “keyTag” value must be defined per field. Same keytag value could be used for all data.
3.1. Encryption
Sensitive data will be encrypted with AES256bits (RFC 3565) encryption in GCM mode with an random initial vector or set with the requestId (without “-“ character).
Notes that usage of CBC mode and IV =0 is deprecated for security reason.
The encrypted field is always exchanged in Hexadecimal format.
The main steps are:
- Depending on config, IV is either the session ID without dashes, a random value,
or null (only zeros); - IV is truncated to the algorithm's corresponding IV length (12 bytes / 24 hex char);
- IV's chars are converted from hex to bytes array;
- data is converted to bytes array, using UTF-8 char-set;
- data is encrypted using the key, the IV and the algorithm ("AES256GCM_NOPADD") corresponding to the configured key;
- encrypted data is converted from bytes array to an hex string.
Whatever the implementation, it must be able to produce the same result depending on algo, key and IV chosen.
3.2. Samples
Key
XOR1: B3EE911BA049ADBEE36B0445C8FC8A2832E7646316F111BCFA3EE062B0379E23
CCV1: BF36D7
XOR2: 50A813F0A59FFADDFEFE06904A4E4E42DF30026CE63FECEEAB92043C667FBC0C
CCV2: DA684A
Clear key: E34682EB05D657631D9502D582B2C46AEDD7660FF0CEFD5251ACE45ED648222F
KCV: 84A0D9
Encryption (GCM)
IV: 00000000000000000000000000000000
Data to encrypt (Clear PAN): 4263540111825682
Data encrypted – in hexadecimal: 68e94ab51334a794c10ebdb76b7480cebb740d8d655396cf7626b1177ad9a78f
IV: 384000008CF011BDB23E10B96E4EF00E
Data to encrypt (Clear PAN): 4263540111825682
Data encrypted – in hexadecimal: 0ead51b9582223c003fcf13195fd3c83d39c2f8cb6a6000dfcc758401fb5e7ea
Encryption (GCM)
IV: 384000008CF011BDB23E10B96E4EF00E
Data to encrypt (Clear PAN): 4263540111825682
Data encrypted – in hexadecimal: b045162d84b792ee2c89e098d05369defa09bd5eaea899058c8f83da3395f663 (value and tag concatenated)
Decryption: "b045162d84b792ee2c89e098d05369de" and tag "fa09bd5eaea899058c8f83da3395f663" → "4263540111825682"
Oauth 2.0 API
Oauth 2.0
1. Overview
OAuth 2.0 is an open standard for access delegation.
OAuth 2.0 enables a third-party application to obtain limited access to an HTTP service by allowing the third-party application to directly obtain access on its own behalf. This allows the API to be secured by requiring the third-party application to obtain an access token from the authorization server with the necessary permissions to access the API resources. This helps in ensuring that only authorized applications can access the API and that the access is limited to the specific permissions granted.

In OAuth 2.0, there are main actors:
- the client (the application requesting access to the user's data),
- the authorization server (which authenticates the user and issues access tokens),
- the resource server (which hosts the protected user data).
2. Implementation
ACS' Client API could be secure by using Oauth 2.0 protocol.
Oauth 2.0 could be configured for all standard Client API :
- Scoring
- Card Referential
- Authentication
The same access token can be reuse for all API, or a dedicated access token could be requested per API.
We recommend to use the same access token for all API.
2.1 get AccessToken
This endpoint is necessary to get the authorization string from the OAuth external source.
As an execution result a Token object will be retrieved and “access_token” field data will be extracted for future usage.
An application access token is requested by calling API token endpoint: POST /oauth2/token.
Requesting an application access token requires the following parameters to be supplied :
- grant_type fix value, must be equal to "client_credentials"
- client_id (for JWS signature)
- scope (optional)
The client id is defined during the implementation project phase.
The scope is optional and could be customized if needed depending on Server methods security controls. The scope could be generic or a list of API/methods authorized.
By default, the product scopes are :
- card-credentials:view
- card-credentials:update
- scoring-request:execute
- authentication:initiate
- authentication:validate
- authentication:cancel
2.2 API adaptation
All API requests using Oauth 2.0 must contain at least the following headers: Date, Digest and Authorization.
In order to verify that the message was not tampered with during transit, a signature is also requested.
Two types of signature can be implemented :
- HTTP signature, in this case, API requires a "Signature" header to be supplied
- JWS signature, in this case, API requires an "X-JWS-Signature" header.
Oauth 2.0 authentification is configurable and can be “activated” for customer upon necessity.
Example of “getCardWithCredentials” method with all mentioned parameters present in the “header” section of the request :

Date | |
Description | The "Date" header field represents the date and time at which the message was originated |
Mandatory | Yes |
Format | The expected format is a fixed-length and single-zone subset of the date and time specification used by the Internet Message Format in GMT |
Example | Wed, 25 Oct 2023 13:00:05 GMT |
Digest | |
Description | The "Digest" header is used to verify the integrity of the message body exchanged between Client and Server platforms. |
Mandatory | Yes |
Format | The digest is done by calculating the SHA-256 hash of the payload of the message and Base64 encoding the hash. The digest is prefixed by string “SHA-256=”. |
Example | SHA-256=8HAW5Ig3X/RCOG840pFdji5JnPGNa4i32lsilUt3qK4= |
Authorization | |
Description | Field used for request authorization on the OAuth2 side. It contains the bearer token ; A security token with the property that any party in possession of the token (a "bearer") can use the token in any way that any other party in possession of it can. The access token is returned in response of /oauth2/token endpoint |
Mandatory | Yes |
Format | String of alphanumeric characters, up to 2048 “Bearer ” + access token value |
Example | "Bearer eyJjdHkiOiJKV1QiLCJlbmMiOiJBMjU2Q0JDLUhTNTEyIiwiYWxnIjoiZGlyIn0..yQGpzEpF3OT1y_QZUzL2 ] |
3.3.1 HTTP signature
Signature | |
Description | The signature header requires the 4 following parameters to be supplied: - keyId - The client ID of HUB platform defined during the Oauth 2.0 project, - algorithm - The algorithm can be 'rsa-sha256', - headers - The list of the headers that will be included in the signature, currently the headers required are '(request-target) date digest', - signature - The calculated signature of the header values, using the chosen algorithm (eg. rsa-sha256). |
Mandatory | Yes for HTTP Signature |
Format | String of alphanumeric characters |
Example | keyId=\"e77d776b-90af-4684-bebc-521e5b2614dd\",algorithm=\"rsa-sha256\",headers=\"(request-target) ] |
3.3.2 JWS signature
X-JWS-Signature | |
Description | JWS Signature is composed of [protected header].[payload].[signature value] where : - protected header encoded in B64 - payload is empty - Signature is the B64 encoded result of Signature of JWS B64 encoded header concatenate with HTTP header String |
Mandatory | Yes for JWS signature |
Format | String of alphanumeric characters |
Example | Cf. description below |
The JWS structure shall be carried in HTTP header field named "x-jws-signature".
A JWS protected header parameter is composed of parameters :
- "b64” ; the JWS header shall include b64 header parameter set to false
- “x5t#S256” is the digest (fingerprint) of the X.509 signing certificate using SHA 256. "x5t#S256" shall be checked against the certificate used to validate the signature
- crit:["sigT","sigD","b64"] - Non-standard JWS header parameters (ie. not defined in RFC 7515), which are critical
- "sigT" shall be present and set to the time that the signature was created. The time shall be indicated in UTC (ending in "Z") and shall indicate date and time to the second.
- "sigD" header parameter shall be present and shall contain :
- “mId" set to http://uri.etsi.org/19182/HttpHeaders
- "pars" should include the following HTTP Header field names:
- "(request-target)" for HTTP Requests
- "Content-Type"
- “Digest” enables protection of the HTTP Body
- "alg" identifies the cryptographic algorithm used to create the JWS Signature Value. Use RS256
Example of protected header
    { "b64":false,
    "x5t#S256":"dytPpSkJYzhTdPXSWP7jhXgG4kCOWIWGiesdzkvNLzY",
    "crit":[ "sigT", "sigD", "b64" ],
    "sigT":"2023-11-26T11:26:57Z",
    "sigD":{ "pars":[ "(request-target)", "content-type", "digest" ],
    "mId":"http://uri.etsi.org/19182/HttpHeaders"
    },
    "alg":"RS256"
    }
Example of protected header encoded in B64 (without line breaks or extra spaces)
eyJiNjQiOmZhbHNlLCJ4NXQjUzI1NiI6ImR5dFBwU2tKWXpoVGRQWFNXUDdqaFhnRzRrQ09XSVdHaWVzZHprdk5MelkiLCJjcml0IjpbInNpZ1QiLCJzaWdEIiwiYjY0Il0sInNpZ1QiOiIyMDIzLTExLTI2VDExOjI2O
jU3WiIsInNpZ0QiOnsicGFycyI6WyIocmVxdWVzdC10YXJnZXQpIiwiY29udGVudC10eXBlIiwiZGlnZXN0Il0sIm1JZCI6Imh0dHA6Ly91cmkuZXRzaS5vcmcvMTkxODIvSHR0cEhlYWRlcnMifSwiYWxnIjoiUlMyNTYifQ
A HTTP header parameter
- request-target :
- digest :
- content-type : application/json
Example of HTTP header
    (request-target): post /initiateAuthentication
    content-type: application/json
    digest: SHA-256=+xeh7JAayYPh8K13UnQCBBcniZzsyat+KDiuy8aZYdI=
Where digest is the hash in SHA-256 of request body
All the header parameters contained in JWS Protected Header are protected by the signature.
The data must be signed with the private key (associated with the certificate identified in "x5t#S256") by using the chosen algorithm (specified in “alg” parameter).
Data to sign is the concatenation of protected header encoded in B64 and HTTP Header separated by “.”
Example of input Data for Signature
eyJiNjQiOmZhbHNlLCJ4NXQjUzI1NiI6ImR5dFBwU2tKWXpoVGRQWFNXUDdqaFhnRzRrQ09XSVdHaWVzZHprdk5MelkiLCJjcml0IjpbInNpZ1QiLCJzaWdEIiwiYjY0Il0sInNpZ1QiOiIyMDIzLTE

xLTI2VDExOjI2OjU3WiIsInNpZ0QiOnsicGFycyI6WyIocmVxdWVzdC10YXJnZXQpIiwiY29udGVudC10eXBlIiwiZGlnZXN0Il0sIm1JZCI6Imh0dHA6Ly91cmkuZXRzaS5vcmcvMTkxODIvSHR0cE

hlYWRlcnMifSwiYWxnIjoiUlMyNTYifQ.(request-target): post /initiateAuthentication


    content-type: application/json


    digest: SHA-256=+xeh7JAayYPh8K13UnQCBBcniZzsyat+KDiuy8aZYdI=
Example of Signed Data
Q9ZSYXJ0QWSoPBfBUR58Sqplw7BQcrcqVR6rvnqfBOvosbBLcsBjkjzi1kCF 2cJsHTJRtp6GcJmZplqRg-7_QBKQAgkUq0BGQpzZwhVYrvP0opdLEarVBrej YA05gt3qnleuS53DWmyZu9iNxhwJTY

VPyXediwo3TIlSn-8XjSTZAVHa728E WK6XzRC9rEroXYPYd23iQLXetMygLaDhRT2lGhV5WvmO0wC0B6RbGiYl2zIv D0XliMP6MidX4SDY5zlzyWyFlHqX7eHpkH8xxqAsBdKb16y4IdOoRhil9yws

 vlzkG6-U9jmBU4y_m3mZArD22oRVXTywzFn9NUtY9w
X-JWS-Signature is the concatenation of protected header encoded in B64 and Signature value separated by “..”
Example of JWS Signature
   eyJiNjQiOmZhbHNlLCJ4NXQjUzI1NiI6ImR5dFBwU2tKWXpoVGRQWFNXUDdqaFhnRzRrQ09XSVdHaWVzZHprdk5MelkiLCJjcml0IjpbInNpZ1QiLCJzaWdEIiwiYjY0Il0sInNpZ1QiOiIyMDIzLTE

xLTI2VDExOjI2OjU3WiIsInNpZ0QiOnsicGFycyI6WyIocmVxdWVzdC10YXJnZXQpIiwiY29udGVudC10eXBlIiwiZGlnZXN0Il0sIm1JZCI6Imh0dHA6Ly91cmkuZXRzaS5vcmcvMTkxODIvSHR0cEhlY

WRlcnMifSwiYWxnIjoiUlMyNTYifQ..Q9ZSYXJ0QWSoPBfBUR58Sqplw7BQcrcqVR6rvnqfBOvosbBLcsBjkjzi1kCF 2cJsHTJRtp6GcJmZplqRg-7_QBKQAgkUq0BGQpzZwhVYrvP0opdLEarVBrej YA05gt3qnleuS53DWmyZu9iNxhwJTYVPyXediwo3TIlSn-8XjSTZAVHa728E WK6XzRC9rEroXYPYd23iQLXetMygLaDhRT2lGhV5WvmO0wC0B6RbGiYl2zIv D0XliMP6MidX4SDY5zlzyWyFlHqX7eHpkH8xxqAsBdKb16y4IdOoRhil9yws vlzkG6-U9jmBU4y_m3mZArD22oRVXTywzFn9NUtY9w
Internal BIN Attack Alert WS Server
Authentication
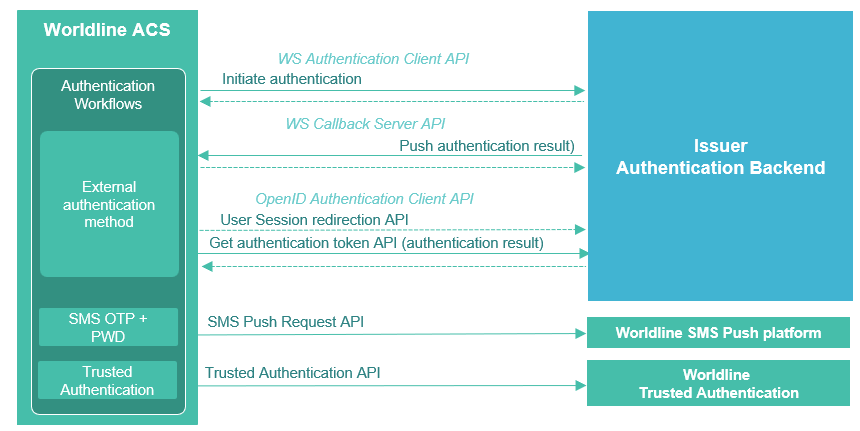
The Authentication process can be provided by banks on their authentication platforms. In this case ACS uses an API the Authentication WS Client to manage it.
Banks use API the Authentication Callback Server and/or the Authentication Callback Decoupled Server to send the authentication result to ACS.
The Authentication can also be done on OpenId system and in this case ACS uses an API the Authentication OpenID WS Client to manage it.
REST API V2 - 2.36.1
Version 2.35.2 to 2.36.1
What's New
No API added.
What's Changed
POST /issuers/{issuerId}/accounts/external-accounts/{issuerAccountExternalReference}/reverse-reimbursement-operation
Request body :
- Added property specificFields (object)
POST /issuers/{issuerId}/accounts/external-accounts/{issuerAccountExternalReference}/reverse-payment-operation
Request body :
- Added property specificFields (object)
POST /issuers/{issuerId}/accounts/{accountReference}/reverse-reimbursement-operation
Request body :
- Added property specificFields (object)
POST /issuers/{issuerId}/accounts/{accountReference}/reverse-payment-operation
Request body :
- Added property specificFields (object)
GET /issuers/{issuerId}/accounts/external-accounts/{issuerAccountExternalReference}/statements/last
Parameters:
Deleted: includeOriginalAccount in query
GET /issuers/{issuerId}/accounts/external-accounts/{issuerAccountExternalReference}/statements/next
Parameters:
Deleted: includeOriginalAccount in query
GET /issuers/{issuerId}/accounts/{accountReference}/statements/last
Parameters:
Deleted: includeOriginalAccount in query
GET /issuers/{issuerId}/accounts/{accountReference}/statements/next
Parameters:
Deleted: includeOriginalAccount in query
GET /issuers/{issuerId}/accounts/external-accounts/{issuerAccountExternalReference}/statements/last/operations
Parameters:
Deleted: includeOriginalAccount in query
GET /issuers/{issuerId}/accounts/external-accounts/{issuerAccountExternalReference}/statements/next/operations
Parameters:
Deleted: includeOriginalAccount in query
GET /issuers/{issuerId}/accounts/{accountReference}/statements/last/operations
Parameters:
Deleted: includeOriginalAccount in query
GET /issuers/{issuerId}/accounts/{accountReference}/statements/next/operations
Parameters:
Deleted: includeOriginalAccount in query
POST /issuers/{issuerId}/cards/external-cards/{issuerCardExternalReference}/block-and-replace
Request body :
- Changed property replaceCardRequest (object ReplaceCardRequest)
- Changed property cardContract (object ReplaceCardRequest.CardContract)
- Changed property card (object ReplaceCardRequest.CardContract.Card)
- Changed property externalAuthorizationsRestrictions (array)
- Changed items (object ExternalAuthorizationsRestriction)
- Changed property activationStartTime (string -> string-date-time)
- Changed property activationEndTime (string -> string-date-time)
- Changed items (object ExternalAuthorizationsRestriction)
- Changed property externalAuthorizationsRestrictions (array)
- Changed property card (object ReplaceCardRequest.CardContract.Card)
- Changed property cardContract (object ReplaceCardRequest.CardContract)
POST /issuers/{issuerId}/cards/external-cards/{issuerCardExternalReference}/replace
Request body :
- Changed property cardContract (object ReplaceCardRequest.CardContract)
- Changed property card (object ReplaceCardRequest.CardContract.Card)
- Changed property externalAuthorizationsRestrictions (array)
- Changed items (object ExternalAuthorizationsRestriction)
- Changed property activationStartTime (string -> string-date-time)
- Changed property activationEndTime (string -> string-date-time)
- Changed items (object ExternalAuthorizationsRestriction)
- Changed property externalAuthorizationsRestrictions (array)
- Changed property card (object ReplaceCardRequest.CardContract.Card)
POST /issuers/{issuerId}/cards/{cardReference}/block-and-replace
Request body :
- Changed property replaceCardRequest (object ReplaceCardRequest)
- Changed property cardContract (object ReplaceCardRequest.CardContract)
- Changed property card (object ReplaceCardRequest.CardContract.Card)
- Changed property externalAuthorizationsRestrictions (array)
- Changed items (object ExternalAuthorizationsRestriction)
- Changed property activationStartTime (string -> string-date-time)
- Changed property activationEndTime (string -> string-date-time)
- Changed items (object ExternalAuthorizationsRestriction)
- Changed property externalAuthorizationsRestrictions (array)
- Changed property card (object ReplaceCardRequest.CardContract.Card)
- Changed property cardContract (object ReplaceCardRequest.CardContract)
POST /issuers/{issuerId}/cards/{cardReference}/replace
Request body :
- Changed property cardContract (object ReplaceCardRequest.CardContract)
- Changed property card (object ReplaceCardRequest.CardContract.Card)
- Changed property externalAuthorizationsRestrictions (array)
- Changed items (object ExternalAuthorizationsRestriction)
- Changed property activationStartTime (string -> string-date-time)
- Changed property activationEndTime (string -> string-date-time)
- Changed items (object ExternalAuthorizationsRestriction)
- Changed property externalAuthorizationsRestrictions (array)
- Changed property card (object ReplaceCardRequest.CardContract.Card)
POST /issuers/{issuerId}/contracts/create-consumer-contract
Request body :
- Changed property addCardsAccounts (object CreateConsumerContractRequest.AddCardsAccounts)
- Changed property accounts (array)
- Changed items (object CreateConsumerContractRequest.Account)
- Changed property externalAuthorizationsRestrictions (array)
- Changed items (object ExternalAuthorizationsRestriction)
- Changed property activationStartTime (string -> string-date-time)
- Changed property activationEndTime (string -> string-date-time)
- Changed items (object ExternalAuthorizationsRestriction)
- Changed property externalAuthorizationsRestrictions (array)
- Changed items (object CreateConsumerContractRequest.Account)
- Changed property cardContracts (array)
- Changed items (object CreateConsumerContractRequest.CardContract)
- Changed property card (object CreateConsumerContractRequest.Card)
- Changed property cardOrder (object CreateConsumerContractRequest.CardOrder)
- Added property deliveryType (string)
- Added property deliveryBranchCode (string)
- Changed property cardOrder (object CreateConsumerContractRequest.CardOrder)
- Changed property card (object CreateConsumerContractRequest.Card)
- Changed items (object CreateConsumerContractRequest.CardContract)
- Changed property accounts (array)
POST /issuers/{issuerId}/contracts/external-contracts/{issuerContractExternalReference}/add-cards-accounts
Request body :
- Changed property accountHierarchy (object AddCardsAccountsRequest.AccountHierarchy)
- Changed property accounts (array)
- Changed items (object CreateConsumerContractRequest.Account)
- Changed property externalAuthorizationsRestrictions (array)
- Changed items (object ExternalAuthorizationsRestriction)
- Changed property activationStartTime (string -> string-date-time)
- Changed property activationEndTime (string -> string-date-time)
- Changed items (object ExternalAuthorizationsRestriction)
- Changed property externalAuthorizationsRestrictions (array)
- Changed items (object CreateConsumerContractRequest.Account)
- Changed property accounts (array)
- Changed property cardContracts (array)
- Changed items (object CreateConsumerContractRequest.CardContract)
- Changed property card (object CreateConsumerContractRequest.Card)
- Changed property cardOrder (object CreateConsumerContractRequest.CardOrder)
- Added property deliveryType (string)
- Added property deliveryBranchCode (string)
- Changed property cardOrder (object CreateConsumerContractRequest.CardOrder)
- Changed property card (object CreateConsumerContractRequest.Card)
- Changed items (object CreateConsumerContractRequest.CardContract)
POST /issuers/{issuerId}/contracts/{contractReference}/add-cards-accounts
Request body :
- Changed property accountHierarchy (object AddCardsAccountsRequest.AccountHierarchy)
- Changed property accounts (array)
- Changed items (object CreateConsumerContractRequest.Account)
- Changed property externalAuthorizationsRestrictions (array)
- Changed items (object ExternalAuthorizationsRestriction)
- Changed property activationStartTime (string -> string-date-time)
- Changed property activationEndTime (string -> string-date-time)
- Changed items (object ExternalAuthorizationsRestriction)
- Changed property externalAuthorizationsRestrictions (array)
- Changed items (object CreateConsumerContractRequest.Account)
- Changed property accounts (array)
- Changed property cardContracts (array)
- Changed items (object CreateConsumerContractRequest.CardContract)
- Changed property card (object CreateConsumerContractRequest.Card)
- Changed property cardOrder (object CreateConsumerContractRequest.CardOrder)
- Added property deliveryType (string)
- Added property deliveryBranchCode (string)
- Changed property cardOrder (object CreateConsumerContractRequest.CardOrder)
- Changed property card (object CreateConsumerContractRequest.Card)
- Changed items (object CreateConsumerContractRequest.CardContract)
What's Deprecated
No API deprecated.
API version 2.36.1
Transaction WS
Transaction Export WS
Current version 25R2-1.0 of October 14th 2025

It is a public API to export transaction details for a given list of ACS transaction ID(s).
The API takes in Input : 1 to 10 ACS Transaction ID and returns a list of transaction(s) in JSON format.
The complete list of fields available on the API response is described in the swagger API.
Notes that sensitive data should be encrypted.
There is no sensitive PCI-DSS data (as PAN is not provided)
Sensitive Data are regarding GDPR :
- billing and shipping address,
- phone number
- cardholder name
- IP address